
Surgery
RL HoLEP videos: A 200 cc prostate with bladder microlithiasis
Dr. Fernando Gómez Sancha · ICUA
Dr. Fernando Gómez Sancha · YouTube
Language: English. YouTube audio metadata.
Surgical content for professionals. Contains footage of an operation.
Playback connects to YouTube. Your search query is not sent to the player.
About this video
An en-bloc HoLEP in a 200 cc prostate with bladder microlithiasis, as documented by the title and description. The written source is brief and does not describe how the microlithiasis was managed or provide postoperative results.
Documented details and sources
Only details explicitly stated in the sources. Missing information does not mean it did not occur.
- En bloc
This is a nice video of an en-bloc HoLEP in a big prostate...
- Bladder / diverticular stones
RL HoLEP videos: A 200 cc prostate with bladder microlithiasis
- 200 cc
RL HoLEP videos: A 200 cc prostate with bladder microlithiasis
Source checked: 2026-10-06.
Available transcript · English
Automatic YouTube captions, not clinically reviewed. Names, technical terms and numbers may contain errors. Check them against the video; complete audio coverage has not been verified.
Selected spellings of enucleation, morcellation and holmium terms have been edited. This is not a full audio or clinical review; the original captions remain the source.
They may contain transcription or translation errors; check the explanation in the video.
- Okay. So, this is very common when we enter to find that the juga synthetic urethra is a little bit tight. So, I'm going to dilute it carefully with the the I think or I'll try if it will give as I try to come in very carefully. It's it's very nice. Here we are. This is it. Okay. So, now you can see it's a big prostate because the ver is up there. You see it's a long frenolum for the verontanum. And here we are trying to go in.
- But I'm not going to force the entry because I don't want to I don't want to split. Oh, there's some stones. Let's see if I can enter carefully. I'll put my left hand on the abdomen. Good morning. to see if I can go in carefully. But uh I don't want to put too much traction, too much force because you see it's a very long very long uh prostate and there are many many stones. Let's see if we can aspirate them using the the venturi effect because of course we
- don't want to have this in the bladder when when we morelate litter. Huh. Let's fill the bladder again. So, basically what I do is I fill the bladder and then let the flow come out. This man has been probably passing stones. No. Uh during voiding for quite a while. Now that the bladder is full, I just open a little bit. You see on the outflow of water is going to bring many of these little stones out with the venturi effect. I prefer this very much to the using um an elic evacuator. The elic is a blind
- instrument. Sometimes you can suck the bladder mucosa. Yeah, it's useful sometimes, but I prefer to to to do this very gentle extraction of of the stones if I can. Also, when we break a stone, I I like to take the fragments out very carefully. So, one more one or two more uh of these. I think we will get rid of many many of the stones. But he has he has too many. I guess it's like dust. thick dust. That's a yo, by the way.
- So, here we are. We're going to be a little bit more comfortable. We don't have hundreds of stones around us. So there are many many still. So we will not be able to remove all of them. I think completely just majority of them before we start the inocation. Okay. So big land, lots of little little stones. Let's see what happened. Do I have a fiber please? Thank you. Let's see what happened to the sphincter. Because you see the problem of going in, forcing our way in is that sometimes you see the sphincter
- suffers here at 12:00. There's some, you see, some suffering. I don't know if this will come out. probably not. Okay. So, here we have already uh here's the fiber a view. This is the sphincter. You see it split at 12:00. Huh. So, let's mark the the white line. Let's see if I can control this little one. It's not going to help much. We're going to mark the white line here. Focus a little bit better.
- And then come come to the other side. And here this is the pillar of the sphincter. And that's the that's the lobe itself. So we're coming down down down. to find our way here and that's going to serve as a reference of the location of of the sphincta. So normally I wouldn't have entered the bladder. I would have just started trying to prevent this uh sphincter you see split because of the shaft of the endoscope coming in the bladder. But when I saw the stone, I suspected, you know, there might be more stones inside. As usual in the bigger
- prostates, the plane is quite quite beautiful, quite nice. So, we can just enter the paracolicular space in this side. And then we're going to try to enter the paracolular space in this other side. So, we go to the floor of the verontanum here. You see to the floor lateral to the verontanum to find this find this plane. Let's see. It has to open up for us. There you are. Okay. So now we have a nice entry in both sides. It looks like a nice plane. And here we're going to try to connect again one side with the
- other side here. So we can start developing the posterior plane. Here I always um think of the prostate as a box as if it was a box. So we will discuss there's always planes and lines of dissection. In this case this is the posterior plane. And this is the posterior line. Okay, this is the nomenclature I use when I refer to to a nucleation. And uh as you know a box has four sides. So the prostate also has four sides. The lower side, lateral sides, and the anterior sorry the posterior, lateral, anterior. So initially I'm going to try to develop the posterior plane. I like to do this uh broad
- broad movements of the fiber that go from one side towards the other you know very long very long movements because I want a uniform line. Uh if you if you do very short movements like this you will get deepening in one place but the rest will not be uniform. And you see in an operation where it is so important to have a the right working distance you know to get the effect you want. It is much nicer to work with uniform lines than with uh let's say irregular depth lines. No. So if you can have a very uniform uh line of dissection everything is organized everything is easy to understand. Let's see how much more can we go to the side. I don't like to force
- the dissection of the sides here because I will be forcing the sphincter. Also notice the slow movement. I I move slowly but in exchange for that I dissect. You see when I move towards the right and I dissect when I move towards the left because that's the way to move forward in the operation. Huh? If you want to be efficient, so I see a lot of people doing only one one way dissection like this. So they stop all the time. There's no need to stop. The laser can take it. Lasers are happy working. So now we come with the fiber 12:00. This is our white line. So we're going to stick to that. And the first thing I'm going to do is
- to try to deepen a little bit this edge between the sphincter and the apex. I want to generate some more space. We have to go under the sphincter and over the adenoma over there. So this initial incision it's just you always have to have the reference of the fiber size. You see the fiber diameter is is 0.5 mm. So we are seeing everything with much um augmentation much amplification of the image. So we see very very tiny not micro microscopic but minimal size detail. Huh. So we can we can have this view of the planes and
- we we can uh process probably these are glands huh you see gland glandular cavities and here I want to connect the line that we had uh marked posteriorly with the lateral line that I'm initiating here I stay low this is the low part of the lateral line because I don't want to force up uh with my endoscope to to make force on the sphincter. So remember, uh very slow slow movements, wide movements that travel far if if you can you see to get uniform uniform lines. Okay, there there we are. This is now the lateral plane starting. Very nice. Very nice to see that. Here we have to continue going
- up you see but we're going to start always by doing this access incision. The access incision will present you see the fiber as I said measures.5 mm. So we're doing a 1 mm cut into the you know edge of the sphincter and the the adenoma. Oh, we want to generate some space initially with this incision so we can start to see very well where is the plane going and um and also I always talk about the definition of holip and the definition of holip to me is is a procedure where we progressively and strategically dissect capsule from adenoma.
- Um this dissection will provide us with mobility know enhanced mobility of the adenoma. We can start displacing the adenoma towards uh the direction we want. So when when I have a free adenoma from the capsule, I can move it. I can put my endoscope against it and you know displace it a little bit towards the side or downwards or anteriorly. And uh this mobility is going to give us access to places where initially we couldn't access because of course the capsule and the adenoma were fixed. But you see if you don't generate the access if you don't generate the access you don't generate if you don't sorry if you don't generate the mobility you don't generate the access here. You see if we want to come here and if you
- thought this is still attached here there's no way we can go in there. So that's why I I I do this progressive uh ascension very careful always the white line is a good thing because whenever we are in a white region like this is the 12:00 white line now you see whenever we see white we know that the sphincter is going to be safe so this is the access incision it shows us you see where is the real plane often this incision I made is down here you see and when I when we when we find the right plane so we can go to the anatomical plane. So these little incisions are not going to mean that we're going to leave um tissue behind. Okay, here we are trying
- to continue to take care of the lateral line. Huh? You remember we had a plane lateral plane and this is a lateral line and I want the lateral line to be perfect to be uh our source of orientation. You see if you have a nice line of dissection like this you can perfectly um orient yourself during the operation. You see we move towards the lateral plane carrying this uniform line that uh is going to guide us. Okay. All the things that we do down there are not probably stressing the sphincter too much. So that's why I, you know, sometimes get carried away and and do a little bit of the the posterior lateral dissection here. You want to find the
- uppermost plane. We want to go all the way up, you see. And I would always uh encourage to continue gaining mobility you see laterally here before trying to go to 12:00. So don't try to reach 12:00 very fast because if you if you pave your way you know if you if you prepare the the way by you know doing this these lines. Let's see where we are. That looked here. Let's see. Maybe we can go slightly deeper here. Let's see if we can get under that and see where it takes us. It looks like a relatively good, you know, capsular plane here. So maybe you see I want to keep a good line. I want to keep a good reference,
- anatomical reference so we don't get lost. Of course, you want to do one single uh line that comes as close to the capsule as you can. Here we're coming above here. We need to see that distally. You see this is the 12:00 uh fibers here. Let's open up a little bit here. And now we can uh see the upper most the uppermost plane. So you have some pain. So once we get to this point, I think um it is an great advantage that the endoscope is already, you know, on top of of the aex. I said before we need to go above the
- aex and below the sphincter. So the fact that I have my endoscope uh let's say over the apex is allowing me to push it down a little bit you know and carefully carefully try to displace it mobilize it downwards. It's a very high uh plane here and I don't like doing a lot of force. So, let's see. We want to go all the way up there. All the way up there to to try to get to the uppermost uh plane and not leave uh aical tissue. No, there's yellow tissue up there. So, that looks as if we're not totally totally anterior. So we need to find our way because it is it is very very possible to cut horizontally through the adenoma and
- leave and leave some tissue up there. So I'm not very happy with this with the look of this. Let's see. Here we are coming now towards the 12:00 uh region. Here you see this is the 12:00. So sometimes we need to mobilize more. Oh, we don't have a lot of access up there. But I think if we do the other side, maybe we will get somewhat better uh access. Okay. So here here is the mucosa of the sphincter. Here is the the white line in this side. So let's initially deepen the white line a little bit. So we're following this
- line here I think coming all the way towards 12:00. So this is the deepening incision at at uh at the apex. And now we're going to start looking for the lateral plane. Let's see what we find here. Here we are trying to develop the posterior part of the lateral plane. Okay. Often we find this uh little curtain here of tissue and that is because we are um going from lateral towards the center here. And here I want to connect my line. This is quite a normal appearance when I do the entry into the lateral. It doesn't mean that you're
- following a wrong plane or anything. And often when we follow the posterior plane, this is the middle lobe base. And um often we find this uh anatomy where there is this little ligament here. I call it the ligament. It's not a proper ligament. But also when you see yellow uh stuff in the surface, you can try to let's say investigate if it is possible to go a little bit deeper, you know. to try and remove that little bit of tissue there. So maybe our plane goes even further down than it was it looked no when we did the posterior dissection. So here this is I'm guiding myself with the color of of the tissue. If you see
- yellow tissue like that, it's probably a denoma. Huh. Not always because colors are relative no to illumination, having a good white balance, uh, etc. But there we are. So now I come to the epical part here. What's the problem? Water. Lubo, please. Lubo. Yeah. Well done. Okay. So here we're coming up. You see trying to continue the development of the lateral plane. So initially I always do these little access incisions until I can see where is the where's the proper plane? How can we go capsular?
- And um you see the fact that we had a very nice detachable plane in the lower aspect doesn't mean that we're going to find uh an equally good plane in the lateral. So that's why when we see a beautiful plane, we are lucky. You cannot hope to see a beautiful plane all the time. Okay. So to me, when I cannot see a beautiful plane, I'm happy to work with the with the idea of a capsular plane. And a capsular plane for me is a plane that is relatively smooth, that it's fibrous on the surface. Yeah, there's fibers on the surface. You see smooth not bumpy and um it's um let's say coherent which means
- that when you go downwards you can see that this looks as if we are in the same depths as lower here. You see it it is a coherent plane. It doesn't change u you know the space that we are developing reminds us very much of an empty orange you know the prosatic cavity how it should like look like and then of course there's another point in the definition which is important and that is that it's not perforated we don't want to I mean if we see a perforation or if we see depth in the plane that means that probably that's not the right plane h so we need to correct Again I always say that uh developing this lateral plane is like driving a car and actually all the
- planes you know when you drive your car sometimes if you get too close to the outer part of the road you know you need to correct your direction otherwise you will go outside. So here this is like driving. You see I check the quality of the plane that we're getting and then um if it looks very very uh deep in the capsule then I will need to correct my direction you know and I will need to correct my you see here we're coming towards the 12:00 here in this side. So let's do it. Cut the aical tissue first here. Okay. And then let's see how this connects to that. And if we are able in this side to go to the uppermost plane a
- little bit better than on the other side. So here you see I'm trying to progressively access the anterior to start the anterior line and the anterior plane. So we transition from lateral towards anterior. And also it's important to to acknowledge that, you know, the the original or the intuitive approach, you know, when people see this procedure for the first time and and they're looking at what I'm doing, they think that the the image is going to tell me where I have to go so that I will find the answers to the operation on the screen. No. And I have to say that I usually recommend looking outside of the screen
- which means that you cannot I mean you have to imagine I mean we only see like our surgical uh field is about 5 mm. So if you think that the fiber has measures the fiber diameter is 0.5 mm probably our field of view is about 5 mm total. So we only have this view of the overall picture. No, we don't have a camera that allows us to see the general picture of what we have done, what we need to do, where we want to go. So you need to use your memory to remember to remember you know what was the shape, what was the lines, was was the direction of the lines that you have drawn and um to try to remember that. So
- I I I refer to that as looking outside of the screen. So I I notice that I I'm watching my 5 mm of view in the screen, but then I imagine how would the image look like if I could go around the prostate and look and see, you know, the whole uh let's say circumference, the whole circumferential line that we are developing around the prostate. You know, if we had like 10 cameras or 20 cameras, you know, we could see better. But here we have only this microscopic vision, you know, very very very uh limited vision. So we need to use the memory. So of course all the information in the screen is useful. Okay. So when we see
- something here, it tells us a lot of things. For example, often I I use the direction of these fibers. You see, they're going up. So, they're telling me you you need to continue to go up. Huh? Here, you see we found a little bit of depth in the capsule. So, when you find this kind of uh view, you don't want to go deeper than that. Huh? Here. Now, of course, I want to go up. I want to go antior. So, I'm going to work my way up progressing, mobilizing a little bit the lateral part first. You see here, I want to mobilize this lateral part and then slowly slowly try to go up more anteriorly. Let's see here. We always want to cut. You see, I'm noticing some resistance because there's still
- attachments here. So, I'm going to cut these attachments. Let's see if we could, I don't know, get closer towards the 12:00 fibers and try to conquer this antior plane which is a little bit elusive, difficult. Let's see. As we mobilize more, you see as we gain more liberation, more mobilization, the access improves. And then the fact that you can put the endoscope on top of the aexics and push it down, you know, helps a lot. This is a very large gland. They said 100, but I think it's probably more. Let's see. So as as we get more and more detachment we get more mobility and that will grant us passage you know to to the plane and we will get access to that plane. I
- don't like to force the scope. So that's why instead of you know bending the scope with my force I try to find a way to do it uh progressively by gaining better mobility better access. You see the ax moves better now because I have been able to detach it there near nearing the bladder neck here. So now I'm I'm going to work my way you see coming up and this plane looks beautifully capsular. Huh? So I can tell because of the fibrosity of it. I can tell because of the uh color, the continuity, the coherence and also I check that it's not uh it's not
- perforated. Okay, we need to do hemistasis as we go. This this laser is super heostatic but still the prostate is a formidable enemy. So you're going to find cases where even with a you know modern laser you're going to have difficulty. So here this is the plane I wanted to reach. You see antior plane here. I wanted to reach this antior plane. So now we can carefully work our way but still I think we need to connect at 12:00. So when we come out you see here we still have tissue. I will have to deal with this bleeding later. We still have aical apical tissue here. You see that we need to connect. This is the 12:00
- uh tissue, the 12:00 fibers that we had. So, let's see if we can cut it carefully and try to connect to the other side here. We had I think the other side these are 12:00 fibers. You see that's the entry to the plane that we found. there. But we're carrying a higher plane from this side. So let's see how it looks. Let's see how can we, you know, take the good plane that we have here towards the other side. Now, now that I think the apex is completely free. You see, we enter this beautiful antior plane. So that's a great great achievement I think because we want to go there. If you put your scope on top, you see it pulls down the the adenoma. You see, it brings the anoma downwards
- and it facilitates, you know, the the dissection of this of this plane. We want to stick. You see sometimes there are nodules, these these anterior nodules that are you see are sometimes a challenge. Yeah. because you find a plane below a plane below the nodules but you don't find an anterior plane so easily. So in this case we saw it was not so easy to to find the good plane uh from the other side and uh it's a very high plane it's difficult to reach there. Let's see what's bleeding here. Now this is the magneetto setting here.
- We could connect that for extra mobilization I think. And now as we approach this side, let's see what happening at the apex. Huh? Let's see what's happening at the apex. It's not so easy to even when I put my hand on the belly, it's not so easy to reach up there for hemostasis. Okay. So, let's come out to check what's going on here and let's understand uh what we have here. So, these are probably some fibers. We need to clear you see and the plane we were taking
- before was below here. And now we want to, you know, take advantage of the plane that we found uh from the other side and bring this depth of dissection all the way here. Huh? So you're going to find different degrees of difficulty. You know, some cases are very easy, very straightforward, but sometimes we find challenging cases, a little bit more challenging. And the solution is not the force not you know uh making um a lot of force. It's not uh I don't know I mean there's some solutions. Some people might say okay let's continue with my enucleation following this little false plane and then I will go in at the end and with a rectocope I will
- try to resect whatever is left. But probably that's not uh the best option. So here you see we had a reasonable approach you know see if you cannot get the right uh anterior plane from one side try to go to the other side let's see if you can get to that depth and you see that the way that I achieved to go so high was to prepare to mobilize h so when I when I said this definition of enucleation that I said uh it's the liberation of the capsule, you know, separating capsule and adenoma that is strategically providing you more mobility of the adenoma and then the mobility will grant you access to places where you couldn't access before. Okay, so that's that's
- the idea. Uh we progress in our dissection. Uh we carry these uh lines. The lines are super important because you see you see that most of the time I'm operating I'm activating the laser. The laser is doing something useful. So even when we progress apparently very slowly because also you know I don't like to rush uh the dissection. So my usage of energy is very very careful. I like to use the energy very carefully. I want my my so the distance I choose to to fire my laser my fiber against the the line of dissection is is is a distance that will give me a very very soft uh dissection effect because if you
- use a soft dissection effect you know you if you if you get a little bit deeper in the capsule you can recognize it before it's too late you know so if you use the energy very very abruptly if you do very close contact to the tissue. I mean you might be lucky but sometimes this contact is going to carve holes in the in the capsule and then of course if you make holes you know you might end up with a with a bad perforation. Okay. So I try to minimize that. You see the effect I choose is very progressive, very careful, very very very careful because I'd rather go slowly and I don't mind going slowly because as I said the fact that I'm using a continuous action
- so that every minute of the operation something's happening something is improving uh makes the operations quite reasonably reasonably let's say um fast. Okay, which means that sometimes we can do the enucleation phase in 20 minutes. Sometimes it takes us 40. Huh? But in either case, it's a very reasonable time for a for an enucleation. Sometimes we're more lucky. We enter the plane beautifully. You know, there's no difficulty. This is what I call the sympathetic prostate. the prostate helps you and uh you feel that you're very good surgeon because everything works out really well
- and then probably the next case you're humbled by the difficulty. So here we are now this is the anterior line. So you see we've done a circumferential line around the around the the adenoma. Also I have to say that I realized that navigating these lines around the adenoma is quite easy. No some people when they watch the screen they think how does he know where to go? Well, you see my endoscope now is fully in contact with the adenoma which is like a little orange, you know, body and uh of course it is sliding around. So, basically it's taking me to the to the line you see. So, it's not so not so difficult. Here we are entering the bladder finally.
- This is the most uh let's say entry point for many vessels to the prostate. So we need to check the hemoasis carefully. But here you see here we have mucosa sum mucosa of the bladder neck. Now we are starting to enter the bladder and dissecting around. dissecting around. Here we are one more time. I want to check the heistasis because you know that holmium has this uh disruptive way of cutting. So the pulses
- have such high peak power that they develop this explosive boiling of the water in front of the fiber. You see this bubble formation. These are big bubbles that are expanding and that is providing us with the dissection effect. We don't see it. It happens very fast. I'm using 50 pulses per second which means that every second I'm generating 50 expansive bubbles at the tip of my fiber which means that this is what separates the tissue. Usually at when we apply this let's say pressure on the interface between adenoma and capsule logically the plane is going to open following the path of least resistance
- which is usually the the enucleation plane. Okay. So here this is my line lateral line. Here I'm trying to improve my lateral line. And I I tend to work more on the other side. The other side is my favorite. I'm a right-sided polip surgeon, let's say, right wing. And uh so I reluctantly come to this other side to continue the dissection. And here you see now we connect to the to the bladder neck region. No. So now my line is helping me. You see this line is getting more flat. It's not so up and down because we have progressed from the apex anteriorly
- towards the bladder neck. And that means that we are now having a flatter you see lateral line. We will once we enter the bladder neck the objective is going to go to be to go from 12 to six here. So let's progress carefully. Let's look after the the bleeders that we find. And here, this is bladder neck. Again, typically I cut the bladder neck freely until I get to about 8:00 in this side and then 4:00 on the other side and then I go in to check the eos. Okay? Because I think you can safely cut until a certain point where you get closer to the trion. And in this case, you see we go inside uh the bladder to check the
- position of of the UO. No. So here probably we should see the UO. There it is. So we are a little bit far away. Huh? Far away from it. So we are quite happy to insize the bladder neck. I like to leave this when I come here. I like to cut the bladder neck towards the midline to make sure that I leave the edge of that cut. Yeah. Where where the bladder neck incision, you know, connects to the here. You know, I want to be lateral. Sorry, medial medial to the to the UO. We saw the UO there. So, now this line tells us that if we continue cutting here, there won't be uh danger for the UO.
- This is inspired in a concept uh described by a Mexican friend um you know Paco Gome and uh he he often tries to do the incision even before the operation. the incision on the bladder neck to try to prevent he goes from above. In this case, I think it was not so not so easy. And here now we go to the other side. You see also one thing you have to learn is how to navigate with your scope gently inside the inside the the the fossa here. Now this is again lateral line. You see I'm taking it up here to
- the bladder neck and we will continue to you see similar to the other side our lateral line has become more flat now because we did a lot of dissection anteriorly and not so much no we didn't carry the the incision all the way some some some people maybe with if your laser doesn't quagle it very well it might be clever to you know progress more uniformly, you know, like coming down connecting with the posterior developing also the posterior before you open the bladder because one of the nice aspects of blocking nucleation is the excellent irrigation that we get because we irrigate a very small space between that noman capsule. You know, I always wonder how much water
- can you put between that nomen capsule when you haven't opened the bladder yet. Maybe 10 20 milliliters something like that. That looks a little bit deep. So we need to get closer you see to the side of the adenoma. So we don't deepen that more. Huh. This is this is the central concept of of how to navigate the dissection. You see if you if you get if you get outside of the plane if you go outside of the capsular plane then you need to correct. You see this was deep. If we continue cutting here, we can go out of of the capsule. We can, you know, establish a perforation, but we stay a little bit closer. We stay trying to find the right place for for our dissection. We have a lot of
- control and that's going to help a lot here. Mhm. There we are. Blad neck again. Here is like 4:00. So, I'm going to go in again in this side to check the position of the UO. Of course, we know that uh the other side's uh location was a little bit far away from from the get some of these vessels. So, we get more comfort comfortable access here. Better visibility. As I was saying this before, I didn't finish the the comment. No, we were saying that 50 pulses per second, 50 bubbles forming opening the plane. You know, basically the way to cut off the homemium is that
- when you when you fire the homemium energy close to the tissue when when you want to cut a tissue, you you get much closer, the light enters the tissue and interacts with the water inside the tissue. Okay? So the bubble tries to expand inside the tissue. Of course the tissue has a lot of resistance because there's collagen fibers, stroma tissue, muscle fibers and uh so the bubble you know cannot expand properly but it generates this disruptive cutting you know. So basically the bubble opens up the tissue and sometimes the heat in the region because it's a hot bubble is not enough to to quagle it. So
- when you cut the bladder neck here the mucosa tends to tends to bleed a little bit and you have to pay attention to that. Okay. So now we have you see a nice nice det nice demarcation of the blad neck region and now we are going to concentrate on the connection of the you see we want to go from from 12 towards six and we need to see where is this still uh you see connected and where can we how can we continue our connection of this plane here you see it's very very thin uh it's a very thin plane this is what we found before if If I go posterior, I find my posterior line here. So, let's see how can we uh progress towards the bladder neck also posteriorly. Typically, I
- think it's much safer. I mean, I could try to go all the way to the bladder neck. Now, you see, initially, we stopped the initial dissection of the posterior plane because we were getting deeper. It was difficult to lift the prostate because it was attached laterally here. But now we have much more mobility. You see we have been able to mobilize quite a lot of this uh lateral tissue. So now when we try to lift the adenoma with our endoscope to to reach this posterior plane it moves. Huh? You see it it gives us some more space and we can safely let's say navigate this plane that is quite perpendicular now to the fiber. You see the posterior plane is now going up. Let's say it's not so
- um flat anymore. It's now turning towards the bladder neck. And uh so we need to we can we can lift a little bit the adnoma with our endoscope that generates some tension on the line of dissection and we can navigate our way towards the bladder neck. But it's usually much easier. You see, because there's some degree of lateral fixation here, if we release the lateral part first, you know, if we come from the bladder neck downwards to meet the posterior line like this, uh we're going to gain progressively more and more mobility, the the ability to elevate the tissue and expose uh give us access. again this u apparently strange definition that I
- told you about enucleation um you know releasing the capsule from the adenoma to gain mobility to gain access it it makes sense now know it starts to make more sense so and the word strategic uh comes as a very important uh word in the definition no we need to be strategic because we need to gain the mobility we need for uh accessing a certain placeh here. You see we're getting closer and closer to the bladder neck over there. Let's see if we can liberate. Sometimes liberating this little millimeter will give us a lot of mobility uh a lot of access. So that's why we need to progress carefully millimeter by millimeter. Every thing that brings us closer to the end is
- welcome. It's celebrated. You know, we managed to continue, you see, dissecting here. We have a very thin capsule below. So, I'm going to put my my fiber, you see, against the edge of the adenoma. I don't want to fire directly against the line of dissection. I want to keep, let's say, on the side of the adenoma. So that the energy allows me to cut the fibers that are joining at Noma and capsule, but not deepen too much in the capsule. This is the way we can navigate carefully. Many people ask me about the possibility of going retrotrional and like that. And I have to say that for me it's not so common. I mean sometimes we see some thin uh tissue there. Huh. Here I'm trying to lift the the prostate. I'm
- trying to see how much mobility can I get because at some stage if I lift one of the loes it might go in the bladder. Huh? So that tilting one of the loes into the bladder really really changes things because we have much more space. Uh we put half of the adenoma inside the bladder whereas and the other half is still here but we gain a lot of space. Let's see if I can show you. This is now posterior. Huh? Also remember that uh when you go to one side you see you you manage to have some dissection. So you don't follow the same line again. You have to go up close to the adenoma and then do the movement towards the other side. This is what I call the zigzag line. You
- go here, you come towards this side, you gain another millimeter and then before you change direction, you go up again. You see, this is how you navigate the posterior plane progressively and and keeping it safe. Okay, here. Now, let's see if I can uh lift a little bit. lift, push, mobilize the adenoma towards the bladder. We still cannot see the the bladder neck, but now we have a little bit better access down here. You see these fibers are holding the tissue. So I get a little bit more vilization. And here I think we're getting very very close now to the bladder neck region. Uh that plane looks very good. Little vessel there. Maybe we could take some more tissue
- like that. But yeah, here we are. Okay. So, probably now I have lifted. You see the the lobe. I can come back here and push it carefully gently to see if it goes in the bladder. Huh? I think it moved. This is now the prostatic urethra. You see? And this is the the bladder neck. So we were able to displace you know to move to put the this lobe into the bladder. And now of course you see that we are stretching the other side a little bit. Huh. This is the the other side. So let's see how can I lift now this dissect. You see we have much more space to reach down here. So I can now try to release the adenoma from the capsule here. I want to be
- aggressive removing the adenoma. That's why I get so close to to the capsular edge. But I keep my energy, as I said, targeted towards the side of the adenoma. Remember, there are four factors that the surgeon can use to tailor how the energy reaches the tissue. And one is the working distance. As I said, I like a working distance that gives me a very soft effect that allows me to dissect carefully. If I see, you know, deep depending in the capsule penetration, I can then target uh differently. And that's another factor, the targeting. Where do you target your laser to get the effect that you want on the tissue? Then of course, the speed of movement. Remember, we fire 50 times in one second. If we
- if we move at 1 cm/s, we will give 50 pulses in 1 cm. If we move at 2 cm/s, we will only use 25 pulses in 1 cm, which might affect the quality of of hemostasis. It's a beautiful plane here. Here we have the bladder neck and now the prostate is completely tilted, I think. Let's see what we find down here. Here you see there is still no it's just a 6:00 attachment here. Huh. So let's see if the other lobe now will go into the bladder. And then this is the detail I want to tell you. You would think I pushed this lobe into the bladder. Uh let's say I pushed it in this direction. So I will push this one in the other direction. But it's not like that. Uh
- you want to come to this side and push in the same direction. And why is that? Because you see we have a big adenoma which might be even wider than bladder neck. So you want to push in a rotational uh way uh so that we are able to uh squeeze the prostate you know and pass it to the bladder laterally sideways. So this is another important trick because some people find difficulty you know tilting the prostate. Of course if you have difficulty tilting the prostate you can split it normally in the midline but to to to cut it in two pieces but most of the times it's not necessary because we can always almost always elevate one of the loes push it into the bladder and then continue their rotational movement.
- Here now we don't worry about the uos we know they're very far. So I'm going to complete the enucleation nearly 1 hour for this case. So it was quite quite challenging. Yeah, quite uh but as I said the time is not I mean we don't want to be losing time uh because of course time is precious. If you can leave the endoscope less time in the urethra is better. But you see we don't want to rush the procedure. We want to be safe and we want to be thorough. Make sure that we remove everything that we want. Okay, let's uh have a look now uh to see if there's any bleeder that we can. So this is now the coagulating face. Here we have capsular plane everywhere.
- This was the first patient in the list. No. Uh Alex. Alex. Yes. Oh, no. This was the man with the stones. There's a little bit of confusion. Sometimes they change the order of patients and I think I'm operating someone and I'm operating someone else. Okay. Who is this? Uh, Alex. Next patient. This is number two in the list or number three? One. Number one. Okay. Okay. So, he he was the the patient I thought I was operating. So, they estimated 100 grams of of of prostate size, but I think might be bigger because it's too far.
- Might still be some stone in the bladder or something. So, here we are. This is the mugosa ledge. Remember I told you that when you we cut the mucosa there is this um disruptive cutting which doesn't necessarily coagulate at the same time. So when we are dissecting you know in the close space no dissecting capsule from arenoma probably there's more concentration of heat and we get very good first pass heostasis but when we cut the mucosa you see it tends to bleed so you need to be careful because if you have a bleeder here it will uh make uh the morcellation face more uncomfortable because we will have
- bleeding during u morcellation and sometimes these vessels are not so easy to to control. So here I'm using the full virtual basket 250 setting to see if I can get to the bleeding point in there. Wherever it is, the UO is still far away. So we could go looking for that little bleeder because it's going to make our life miserable if we want to morelate some burn. Okay. So we're getting ready now to morcellate. And we need to have a look at this
- sphincter. See what happened. It probably doesn't look very well. Let's see. So, when we come out and then come in, you see there is some I mean this is this is the sphincter. There's some uh this is the 12:00 split we had here. It was a little bit but we did our best to preserve it. So, usually this this works and the patient hopefully will be continent soon. There seems to be a correlation between the look of the sphincter at the end and the functionality which was questioned later by initially Humphre published a
- correlation and then Mario suffer said probably doesn't correlate so well because there are many factors involved in the occurrence of post-operative incontinents. I have to say that when we do the smaller prostates, we can get these beautiful looking sphincters. When we do the bigger prostates, sometimes we succeed, sometimes we don't. The incidence of uh stressing continents is still low. Huh. But okay, let's try to morelate. I think we need 10 15 minutes to finish. Okay, now we change instruments. Here we are.
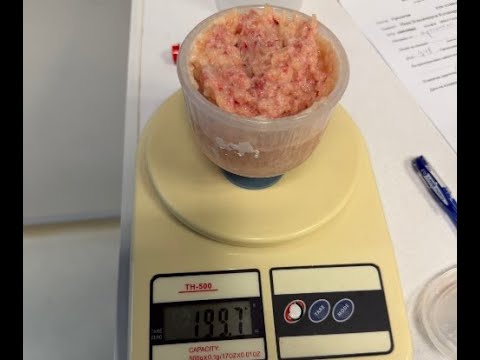
- I'm going to ask Yubo to tell us the weight of the tissue because it's looks a little bit bigger than we expected. Here we are. You see the visibility. It's not so good. Let's see. Oh, because the water is closed. Let's open the water now. We'll see better hopefully. Now, okay. So, bubble. Let's get on over the bladder neck. Let's lower my hands a little bit so that we elevate the tip of the morcellator and we try to morillate in this uh safe position for morcellation. Um it is important to to try to have a technique that allows you to morcellate
- most of the time. You don't want to be moving around too much. These rotational morcellation morcellators have changed the nucleation significantly. I think they're much more efficient than the classic um versa cut morcellator. probably doubling the speed of morcellation and um but still it's necessary to to do the morellulation. It's a little bit unfair you know because it is a somewhat stressful part of the operation for many people and uh you have to do it at the end of the operation when you are a little bit tired and maybe you know
- you had to face a difficult case you're a little bit wasted no you get some little anxiety that's why I recommend people to let's say avoid the anxious um approach to hip I'd rather uh encourage the technical approach to Hollip. You know, you you start your operation and you decide technically what you have to do in each moment. Um and this way you don't get so anxious. You're more enjoying the the operation. And when you get to more solution, you're quite fresh.
- You know, we can only try um we we try to do the best for this sphincter. We try to be careful. We try to you know preserve the mukosa but not always we are able to get this beautiful picture for the videos and everything it um it's a real life huh so but if you used a technique that uh tries to be careful with the sphincter I think the protection of the sphincter is better than if you use the classic encircling maneuver and to break the mukosa completely, you know,
- but still it gives you some stress. Yeah, I operated recently a friend and uh when I came out I saw the sphincter and it looked uh not so good and I was fearing you know what would happen but uh he was perfectly continent perfectly happy. This is uh how it is. No, if if you if you trust the statistics uh the chances of incontinence are quite low. So you shouldn't be suffering for that. Okay, there's it's not so excellent this morcellation today. I can see the mouth of the morsel. Sometimes you see we get a little bit dim visibility and that's why when you do morellulation you need to be as effective as possible
- because you waste time. I mean the you're going to lose visibility and because the visibility decays during morcellation tends to decay. Huh? Sometimes we're lucky and we have very good visibility from beginning to end but sometimes we see that the medium is getting you know more bloody. And also we might encounter some of the stones that were left. Maybe I didn't take them all. I'm not very afraid to leave some of those inside of the bladder because they're quite small and they will come out hopefully when the patient pees. You know, sometimes if they're I mean they're not
- really stones there when you look them outside they're minimal minimal size probably less than 1 millm each something like that. So I don't think they will obstruct the catheter either. There we are. You have to be patient. Stay in a safe position. Remember to bring the the blade uh if you keep it too close to the camera fearing to hit the bladder, you lose a lot of perspective. You see here, the tissue occupies all the image. If you go out like this, you keep the anoma mostly mostly on the on the upper part of the image and then you can see these black triangles on the side of the blade that tell you that
- you're far away from the bladder. The image saturates with the light. The light reflects you know the emission of the light is anterior. So it it reflects on the tissue. That's why we see a very saturated image above. You see the white tissue but you don't see the detail. And of course I think this triggers uh um less Okay, let's change the bucket. Less sensitivity in the camera. So we cannot see the the pink color of the bladder basically because the light is blocked. So it doesn't reach that area and also because the camera is less sensitive to to light to adapt to the brightness of of the reflected light. So but you see when you when you get closer closer to the tissue here for example we
- see the white of the bladder neck or we see the pink you see. So if you see the the black triangles and in this very large prostate also one detail is that you come to the bladder neck you elevate your hands and the the the blade is not even in the bladder you know it's it's still inside the the the the bladder neck opening not not so much into the bladder. So we can find a very safe morcellation position and then we have to continue here we have uh the small I think 3 liter buckets for for the pirania. So we have to change often if if the if the tissue well you know that that morcellation depends mainly on suction. No here
- I'm going to I'm going to momentarily close the suction if I can. Now there is no suction. Look what happens. You see without suction there is no morcellation. The morcellation relies on suction to work. The the the adenoma doesn't want to be morcellated you know. So you need this suction. If the suction I mean if you suck this elastic tissue the tissue will get inside the mouth of of of the blade and then the the blades of of the inner sheath will uh cut the tissue in small pieces that then come out through the center of of the blades which is hollow and some water. Okay. But the amount of water coming out is going to depend on
- the quality of of the tissue. If the tissue is very elastic, you know, then it covers the mouth of the morcellator most of the time. If the tissue is very rigid, sometimes we start seeing the the mouth. You see here the elasticity is good. I think we can hardly see the mouth. That means that there will be tissue coming out with water but not too much water. And usually the inflow is perfectly able to compensate for for this water outflow. I'm only using one inflow. I I do that for simplicity. I recommend people who start uh doing uh moreation to to use two inflows. So four bags, two lines, you know, to get much better inflow
- because that will, you know, prevent uh emptying the bladder. So if I see that the tissue disconnects from the blade, then I won't I won't continue sucking water, you know, because you can suck um I think it's it's more than one liter per minute with this more celator. So that means in 10 15 seconds if you keep the blades rotating and aspirating for for a long time then you will empty the bladder very fast. The other problem is when you empty the bladder when there's not a distension in the bladder the pressure comes down very fast the bladder can be filled almost with no pressure. So the veins uh if there's open veins in the fossa they will start bleeding. So
- so you have to be patient. You have to relax. You have to accept that the case is going to take as long as it takes and there you will be able to be successful. I met one surgeon recently. He was saying to me if I have to operate for more than one hour I'm I get impatient. I'm not happy. I I get frustrated. So I said man you don't you cannot do hip because for hipb you have to have this uh ability to accept that you are in the middle of an operation. Sometimes you wish it finished. Sometimes I found myself wishing h I hope this would finish already. But you have to stay there. H the
- patient depends on you and you have to keep fresh and concentrated trying to finalize the procedure that you fought so much to to complete. No. So the mentality here is to be gentle during the operation to be technical to be excellent. You want to develop these beautiful lines. You cannot be undisiplined. You cannot be you know reckless with this operation. You have to be careful and develop your let's say artistic uh side to to carry these lines to be very very gentle to understand the tissues more and more
- and it becomes a very very enjoyable very enjoyable operation.
- This man is a real really strong young man. So I hope his pelvic floor will be strong as well. one of these guys with a incredible athletic uh composition. This is now inside the fossa. Sometimes pieces come can fall inside the fossa. You see the view inside is not perfect because there is some some u clots but we found some pieces inside. So we need to clear them before we finish. I can aspirate the clot and the tissue will come to us
- if there's some pieces inside. It's almost full. So here now there's only stones and not more tissue. So let's put a catheter. Huh? Good. It was not so Lubo. We want to know the the the weight of the tissue.