
Surgery
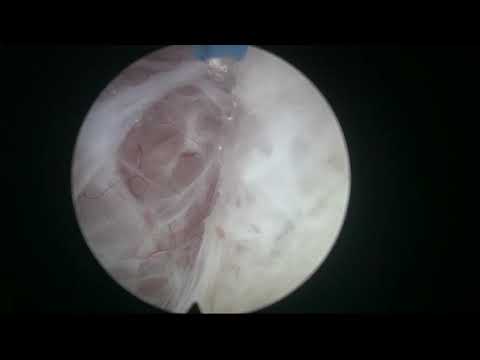
Real Life HoLEP 17 - peripheral zone BPH nodule
Dr. Fernando Gómez Sancha · ICUA
Dr. Fernando Gómez Sancha · YouTube
Language: English. YouTube audio metadata.
Surgical content for professionals. Contains footage of an operation.
Playback connects to YouTube. Your search query is not sent to the player.
About this video
A teaching case identified in the title by a benign prostatic hyperplasia nodule in the peripheral zone. The author added graphics and a voiceover to explain the en-bloc enucleation concepts. The narration was recorded after the operation because audio had not been captured in the operating room.
Documented details and sources
Only details explicitly stated in the sources. Missing information does not mean it did not occur.
- En bloc
This case is quite didactic, and I added some graphic information that might help explain the concepts I insist on for En Bloc enucleation. The audio was not recorded in the operating room, but I decided to record a voiceover due to its high didactic value. I hope you enjoy it.
- Prostatic nodules
Real Life HoLEP 17 - peripheral zone BPH nodule
Source checked: 2026-10-06.
Available transcript · English
Automatic YouTube captions, not clinically reviewed. Names, technical terms and numbers may contain errors.
They may contain transcription or translation errors; check the explanation in the video.
- hello this is fernando homesancha this video was recorded last week and for some reason the audio was not recorded in the operating rooms but i decided to work on the video a little bit because it was a nice case showing very interesting and valuable information for those of you who are learning to do hollop so this i don't remember exactly the characteristics of the case but it's a mid-sized prostate and with an elevated bladder neck and we were going to do a um and then block this section as always but the case was particularly uh favorable in terms of good visibility and i think it has a high didactic value see that the guy has some stones forming and submucosally that's the introduction of the fiber and
- that's the contour of the center you can see how the sphincter is clearly visible that's the 12 o'clock limit and sometimes if you do this maneuver from veru and then tilt up it shows you the the good place but not in every case uh so i would rather um trust what i see in terms of the contour of the sphincter and i like to mark at 12 o'clock initially and then try to bring the incision downwards more or less following the the contour and the limits of the sphincter i don't recommend to go very much inside because the plane is what it is and it reaches the sphincter and if you mark inside it's going to [Music] it's going to cause problems later so i think it's nice to mark exactly where the sphincter
- ends or one or two millimeters inside but not more than that because otherwise you will have a mark and maybe the mucosa will break where the plane truly is so i think there's no risk in being anatomical in this respect when the visibility is good like in this case i think it's a good idea to deepen the white line deepen it a little bit because it will help you a lot to have a nicely established groove separating the tip of the noma from the sphincter it's nice to cut these fibers that join the sphincter to the adenoma because that will give you a very good protection of the sphincter and its mucosa this when we have worse visibility we do this later on in the procedure but of course having such good
- visibilities is wonderful and that's the final cut on the mucosa over the very montana cranial to the very montanum that will complete the white line that's a small push with the tip of the scope you know i use the richer wolf instruments and they have a special tip which is metallic and blunt and it's especially good for this mechanical dissection and but i don't push very hard it has to be a gentle maneuver and never push a neurology and never push hard never use force as uh as a good advice for for neurological procedures endological of course so that's the that's the posterior plane that's the separation between capsule and adenoma and then i position the fiber at 12 o'clock as i always do i like to keep it
- static at 12 o'clock and not rotate the camera because i think rotating the camera adds complexity to the procedure whereas you can perfectly dissect the plane with the fiber at 12 o'clock and as you can see the screen is divided in two you can see anteriorly the adenoma posteriorly the capsule in the middle of the screen the line of attack the fiber is protruding a little bit just one third of the diameter of the scope more or less to provide this very nice setup for dissection of the posterior plane we are going to to dissect a sphere so initially the planes open it opens to the sides opens up opens down and then you have to close these planes and that's very important because you have to choose where you're going to fire
- so initially we're going to fire towards the line of attack and then when we need to close the plane we'll have to fire more against the adenoma so initially firing against the line of attack will open the plane this is the posterior plane you see you don't want to fire against the capsule you just want to fire and there you can see that the posterior apex has been already uh dissected off the of the capsule that's the line sometimes of course you don't want to leave a normative tissue there so you have to you know get your bearings right you have to get your references right that's why sometimes i go a little bit inside to check but again initially i like to cut on their noma here i'm not looking for
- the plane i'm looking for dissecting the apex of the sphincter it's very important and then we will go and look for the right right plane let's see if we can find the right plane that's a little bit mechanical push but very very gentle but it's not opening easily so i will use more energy and see you know when you go a little bit towards the cranial aspect you can see how things get clarified a little bit so now that's another cut probably is the plane or it's very near there is an apical adenomatos nodule anteriorly so we want to take it out so here you see you have to go and take it out even when it's close to the sphincter that's a 12 o'clock region and that is the ascending dissection from
- one side we're going to meet with the other side at 12 o'clock you see while you do this dissection maybe there is some anomalous tissue there let's see what happens throughout the operation you have to try to get as close as possible to the capsule like that it looks pretty good and you see what happens is that when you put the scope on the side of the prostate and then you manage to climb up the nose of the tip of the enoma the tip of the adenoma is going to come down because the scope is going to push it down and then the 12 o'clock fibers are going to verticalize so that's the same maneuver initially i don't mind cutting on the prostate i'm not going to let's say lose the wood plane well that's actually the good plane now
- but initially the intention is to separate the apex from the sphincter and then we will go and look for the good plane very carefully because what i do what i don't want to do is to rip the the sphincter or of course we have protected the mucosa already you see that's uh getting towards 12 o'clock it's important to cut the most superficial the most distal let's say attachments first and then move on to cut the more and more proximal but you don't want to dissect too deep for example in this region the lateral region without cutting the distal attachments anteriorly that's why here we're following a reasonable plain reasonable line this plane is not very beautiful but it will serve as an example and sometimes
- the plane is not what we are used to see in the carefully edited videos and highly selected videos where the plane is very beautiful well sometimes you have to to see these planes and you have to be careful and you have to know that this is not that you're doing something wrong but that the plane is not perfect like in selected videos huh you see the energy from holmen tends to [Music] the the blasts that happen in the tip of the fiber tend to open the plane in the path of least resistance and i think it's a very good way to to to look for the right plane you know if you fire your fiber against the line of attack then you're going to find that the plane will open where it should most of the times
- so here we're following the ascending dissection on the left side trying to keep in contact with the capsule trying to keep anterior anterior anterior because now we have passed the sphincter and here we are communicating both planes both planes there we are so that's the dissection of the anterior plane you see that the fiber is firing against the line of attack initially and that's the sphincter properly preserved and this is the apex totally dissected totally free you can go around it and now the operation turns very easy this is where i think beginners should start you know when you are learning the procedure someone should release the apex and then you can do the circumferential dissection to get used to the fiber and
- the instruments and everything and the only trick here really is to to continuously judge how is the plane looking if you go a little bit deep you have to correct start correcting because we're now probably at the equator of the dissection and as i showed you before now the angles are going to start closing so we're going to need to progressively get the fiber to fire progressively closer to the adenoma right when you fire close to the anoma what you achieve is to disrupt the fibers that are joining the adenoma to the capsule but not penetrating in the capsule so that's why if you choose to fire against the capsule you might prefer it and that's a common common mistake for beginners and if you choose to fire against the line
- of attack you might perforate because the angle of the capsule now it's it's closing so you're almost perpendicular to the to the capsule in in certain areas which means that you have to keep the energy very very close to the adenoma so it disrupts the fibers that unite the enoma or join the adnoma to the capsule and protect the capsule avoid perforating it so it's a very very simple concept and of course you need to see procedures and that's why i'm posting these videos to try to equip you with the best information before you you start your own experience with holmium and also i think if you're going to use some other form of energy is going to be useful information so there it comes you see now the angles
- are closing the fiber progressively will get closer and closer to the abnormal to avoid perforating the capsule the circumferential dissection the second important thing is to keep the dissection uniformly advancing towards the bladder neck so circumferentially now you don't want to develop posteriorly a lot and then not anteriorly or one side and not the other side you want to go around the anoma several times to make sure that the depth of the a section is more or less the same otherwise it can get a little bit more difficult to have an asymmetric dissection you want to make it symmetric here as you can see now when we go to the anterior we have to point towards the midline and uh towards the center of the bladder
- neck you see the angle is changing so you have to take that into account you cannot continue firing let's say against the line of attack you have to fire closer to the adenoma here the scope is tilting a little bit the it's pushing down the abnormal so we can you see get down get down in the dissection get down towards the platter neck that's a very nice plane very good looking not so much bleeding and progressively and slowly and carefully you see you leave the energy to do the job these little explosions on the tip will find the right plane for you but of course you have to be in command of the dissection and judge you have to go a little bit deeper or you have to go a little bit more superficial there what
- i'm looking for is the vertical fibers of the mucosa of the bladder neck you see the we can see circular fibers above the fiber and now we are starting to see more vertical fibers and when we can clearly see the vertical fibers that's in an inequivocal sign that that is the entrance to the bladder so slowly in that direction looking down a little bit you see that's the entry to the bladder it's important to cut the whole depth of the bladder neck it's also nice to have good hemostasis before opening this plane because as you have seen the space that we have been dissecting is very small and the irrigation inside this this space is very very efficient so when you open the bladder if there's bleeding
- the blood will enter the bladder and then maybe it's difficult to keep this wonderful visibility so i think especially at the beginning before opening the bladder neck when you find these fibers before entering the bladder try to do good hemostasis of the fossa and then move on to the next step that's bladder neck we're cutting it down i had already seen that the euros were quite far but i'm checking again you see to to check where we are we don't want to damage the euros if it's possible and the dissection continues it's important to note that the capsule has a white appearance you see and [Music] if you find the adnomatous nodules which are quite common in this region subcervical nodules they're going to look a little bit more
- yellow so you have to be vigilant for the details that looks very capsular very nice despite the quality of the plane is not perfect we found a lot of stones in this cavities that i think it's a nice thing to be able to take them out probably if you did a trp they wouldn't come out because you don't usually go that deep in your resection and as i said we have to be vigilant to look for the quality of the tissue and especially because i think if you need that that's a little bit deep so we have to be careful you see the fiber has to get very close to the adnoma instead of firing against the line that will give you the dissection of this uh plane even when it's uh perpendicular to the to the fiber so
- keep close to the anomaly correct the position so if you dissect a little bit more i don't know what happened there uh if you dissect a little bit more you have to reposition the fiber so it gets close to the enoma again so this is how you advance in your dissection of the posterior plane also of course it's nice to have a nice connection with the blare neck area how if you're going to do the posterior dissection it's nice to have these angles you know from lateral from from from the posterior plane and the lateral plane i mean dissect all this so you can see the bladder neck and because that's going to be an excellent reference to know how much more you need to dissect and how to understand the anatomy so before
- dissecting the posterior plane i think it's healthy to to release these lateral attachments near the bladder neck and then the dissection of the posterior plane is going to be much safer many times we dissect the posterior plane from the lateral to the medial aspect you know following more or less this this region you see this operation is quite relaxed and it's very nice it's very anatomical so there's no tension you know in the operating room we're just happily operating during the surgery so that's how it should be i think so of course it's nice to have good instruments it's nice to have a good camera system uh if you want to do this seriously you have to have good instruments and a good team helping
- you and people who know how to manipulate them oscillator and how to help you change the instruments very fast so here it's very common to you know fear to go under the bladder neck you know to to to invade the retrotrigonal space and so we have to be very careful and as i said keep the fiber close to the anoma so it's not aggressive towards the the capsule you see the difference of color between the normal which is more yellow and the capsule which is more white and here we're going to see something that is very common and i guess many holy surgeons when they find a nodule like this they would cut through the nodule and continue more or less with the same plane but i am more prone to follow this dissection of these
- nodules and i hope we can reach it soon so you can see i know there a nodule because i've seen the video before and uh i think it has some interesting let's say information also for the moment that plane looks good we're coming up trying to connect the posterior with the lateral as we did before trying to reach the bladder neck to progressively approach this posterior plane with good references you see here the plane is dissecting very nicely uh we are very capsular but uh that's normal the capsule tends to be thinner in this in this region and here trying to dissect the posterior aspects judging you know the quality of the fibers the quality of the plane the coherence of the line of dissection
- but then i see that yellow tissue there i think this is something you start suspecting you see that's a little bit yellow when you fire on it so it looks more like a norma you see so the probably is a nodule down there so i'm going back a little bit trying to check and trying to lift this up i'm not afraid of going let's say towards the capsule deepening the dissection because i'm very very careful you see if you start seeing something that you don't like you can always stop and many times you have to do this exploration if you want to let's say to find out but that yellow stuff looks like adenoma so i want to take it out um so very very carefully and very progressively you see trying to lift it
- from the capsule of course these nodules are going to compress the capsule are going to make the capsule very thin when we see this on an mri and i'll show you a picture in a moment you um you can see that these nodules grow inside the peripheral zone but there's always always some let's say compressed capsule or thinned capsule around them so you can safely dissect them as long as you are careful and you know trying to achieve a complete clearance of the enormous tissue you have to constantly judge where's the plane what is the good plane you see because you don't want to leave a nodule of bph tissue that will grow over time after the operation the fossa looks very big but it tends to collapse with time after
- six months patients with you know huge glands 100 gram gram of prostates or sorry more than 100 grams uh they they get a very very small prostate which is maybe 15 20 cc so a nodule that looks irrelevant in a big fossa like this might become obstructive after some time so you don't want to leave the nodules if you can help it i have to say it makes the operation much more interesting and of course you see the round quality of this nodule growing inside the capsule right you see it's diff separated from the anoma it's a separated entity and there we are so you can see the thin capsule behind it but so you have to judge i mean how much risk you want to take some other people tend to vaporize these
- nodules you know instead of taking them out they use the holmium energy to to vaporize the nodule but i think if you can do a safe careful dissection it's probably nicer than coagulating and also you it's more difficult to ascertain the depth of the nodule and to know if you left some tissue behind or not so here i'm constantly using the same principle get close to the nodule fire close to the nodule you see so separate it from the capsule but not penetrate into the capsule see slowly slowly negotiating this until it can be enucleated with the adenoma that's the bladder neck that's the posterior plane see there's very little attachment now here again close to the adenoma close to the adenoma to
- protect the plane here there is a you know some danger where am i pointing where i am pointing because uh that's a retro trigon that's uh it if you push there or if you do a little bit of force sometimes you can you can open it up and of course it's irrelevant but it doesn't look very good now here i am pushing one of the lobes into the bladder and now the other lobe you see it's uh i'm trying to do a rotation of that norma to negotiate the passage that's the nodule you see it left that's a small artery it left it left a footprint and this is an mri where you can see how these nodules grow inside the peripheral zone so it's perfectly possible to take them out and to avoid further growth and that's the end of the procedure you
- see that the capsule down there is a little bit thin after all these operations are not very long you you see that the video takes half an hour for a relatively bulky and normal so it's it's not uh there is a risk of extravasation of water but it's a it's uh let's say small risk i would say also that uh if you find that the capsule is very thin and there could be extravasation of water you can take some precautions like lowering the irrigation fluid never close the airflow you know to cause that distension and a tendency to to extravasate i use a continuous flow cystiscope and i never touch the inflow and outflow you know you want to simplify things and some people are always touching this and i think it's it's a
- mistake so keep the continuous flow flowing you can regulate the pressure at which you work by elevating or descending the irrigation hate the the fluid the bag hate will give you more or less pressure there it is so that's the conclusion of the nucleation you can see there's some very nice fossa and look at the quality of the mucosa you see if you see the image on the right is what you want the image on the left is what you don't want and this is what you got with the classic three lobe technique and the epithelialized sphincter which i think was the explanation for the initial incidence of a stress incontinence temporary stress incontinence but that could last several weeks and i think one of the possible mechanisms was the
- damage of the mucosa of the sphincter you want to protect it and now this is going to be the most lesion we're changing the instrument the systoscope for a nephroscope my nurses are very well trained in how to do this and we can do it very fast so in the meantime i keep the irrigation flowing but then of course we have to change the instrument i hold the external sheath while my nurse takes out the rest of the instrument to do a fast change so we don't decompress the bladder too much that's the uo that's the fossa and that's the oscillator now this is the position for working i'm lowering my hands to elevate the tip into the middle of the bladder and i like to keep the most later blade a little bit inside so
- i can see the gnome anteriorly and two black triangles at the sides of the blade that those black triangles mean that i'm not close to the bladder now if they start turning in pink that means that the bladder is coming closer to me or that i'm lowering the tip and that could mean that there is some risk i had to say this richard wolf morsey later the piranha system is amazing because it really removes the normal very fast we we measured 11 grams per minute of and it really shortens the procedure you know many times when you distend the bladder the distension is going to be causing some some bladder bleeding and of course we're not irrigating the bladder in a continuous flow fashion so visibility tends to drop but if you can
- most light this fast this is really amazing that's the end of the operation i hope you enjoyed it and don't hesitate and nucleate huh all the best to all of you you