
Surgery
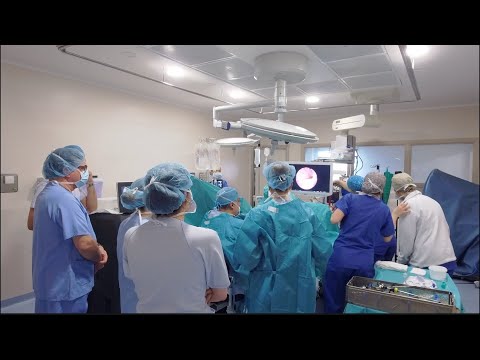
RL HoLEP: A nice teaching case, showing the movements of the hand of the surgeon, difficult plane.
Dr. Fernando Gómez Sancha · ICUA
Dr. Fernando Gómez Sancha · YouTube
Language: English. YouTube audio metadata.
Surgical content for professionals. Contains footage of an operation.
Playback connects to YouTube. Your search query is not sent to the player.
About this video
A HoLEP teaching case that shows the surgeon's handling of the endoscope, laser fibre and morcellator. The title identifies a difficult dissection plane. The additional view of instrument manipulation is the distinctive teaching feature described for this recording.
Documented details and sources
Only details explicitly stated in the sources. Missing information does not mean it did not occur.
- View of the surgeon’s hands
RL HoLEP: A nice teaching case, showing the movements of the hand of the surgeon, difficult plane.
- Difficult dissection plane
RL HoLEP: A nice teaching case, showing the movements of the hand of the surgeon, difficult plane.
Source checked: 2026-10-06.
Available transcript · English
Automatic YouTube captions, not clinically reviewed. Names, technical terms and numbers may contain errors. Check them against the video; complete audio coverage has not been verified.
Selected spellings of enucleation, morcellation and holmium terms have been edited. This is not a full audio or clinical review; the original captions remain the source.
They may contain transcription or translation errors; check the explanation in the video.
- Okay. Trying to go in now, but he's still complaining, you know, a little bit. Focus a little bit. Center carefully. Okay. Veru here on the pillars of the sphincter. You see them now. You see the anatomy a little bit different. Know when you learned recognize these pillars. You see how far sometimes the adenoma goes further down than the veramont. So this is a little bit big prostate probably 120 grams was estimated but that's not too big for hollo.
- One thing that is very very infrequent is a duplex systems. Huh. I have seen very very few cases complete uh system. Do you know duplex uni or bilateral systems it's very rare but sometimes you can find an ectopic urtor somewhere and it's a pain. No, it's a very very you need to recognize that that situation if you can. Here you see that the there's no outflow. Look, there's no outflow because the orififices are let's say uh not letting the the sphincter is closing over the orififices. So it's not letting the water go out. So if there's no outflow, there's no inflow. So you need to get in again, get some irrigation going, you see, and then you can't go back free uh
- briefly. This is a problem with the design of the endoscopes. You see it's it's not uh well designed. The problem with enucleation with uh yeah enucleation instruments is that enucleation has been a niche treatment for a long time. So companies didn't see the benefit in investing in developing good instruments for enucleation because it was only practiced in in a very small number of uh centers. No. So I think we have a white line marked already. Let's go into the plane. Let's see if we can develop a space so we can have better irrigation. No, let's start the procedure here. This is white.
- This is uh our entry into the plane. Let's see. It's sometimes you can go a little bit too deep and then you can correct later. Huh? Let's see. We have the entry in that side. Let's see this side now. This is the easiest place to to find the plane, I think, or to find the start the entry. Now we connect. And now we are going to try to start developing the posterior line. Let's see where do we find a nice depth of dissection. That makes sense. It's not a very friendly plane. No, sometimes you can find the plane doing a little bit of mechanical dissection, but you see not it's not detaching very well.
- There we are going from side to side trying to do a relatively smooth line of dissection, relatively continuous line of dissection. See how far can we take this? Some cases are more friendly than others. So, in this case, the plane is not very very friendly. Let's go now to 12:00 here to to to start the ascending dissection again.
- There we are coming here deepening. You see we have the same problem with the visibility because the shinter closes over the draining uh holes. Let's see if we can start the lateral line. Here also I have some little conflict with the leg. Okay coming up and down and connect. Huh. Sterior line needs to connect to the lateral line. Here we don't go up further because when we remove the endoscope and we go to the apex we see that there is this is my white line you see there's aical attachments here that need to be released so I do this access incision
- sometimes we cut on the adenoma you see I'm going to cut let's say exaggerated normally I wouldn't do that you see I did a cut so all this tissue is getting out of the way and now I can see much better. You see, look, this cut was here, but I'm now going to follow the plane because now I can see very well. You see where where it's where it's uh where is the plane thanks to this access cut. Huh? It's not a a cut that we do trying to follow that cut later on for dissection. It's just it gives us access to see. You see here, now we can see anteriorly. We can see where this wants to go. Here's the 12:00 that we marked with our white line. And here,
- this is the anterior plane coming up. You see, we can go all anterior as much as we can. We cut the epical attachments and then we try to develop more of the lateral line and even a little bit more anterior line. We want to have more mobility. So, I need to detach more a little bit more. So we have more mobility of the adenoma and we can uh you know get better access to the anterior also here. Let's see now 12:00. This is our white line again. You see we we did a mark and it's helping us now to recognize where is the sphincter. It would be very difficult to recognize where is the sphincter once you start the operation. I think you can get very
- confused because as you mobilize the endoscope inside carefully the sphincter gets relaxed you know it's like doing an anal dilotation when you do an anal dilotation initially you can only put a finger then you put two then you put three so I think at the beginning of the operation the sphincter has a lot of tone but as we progress as we progress we start moving the endoscope around the sphincter gets It's much more relaxed you see. So it's much more difficult to see where's the limit here. Again you see when we come out we see that there is aical tissue. This is all white. So we can stay there following this white line that we marked. You see we insize a little bit. This this gives us good access. And then
- we have to decide where's where's the good plane. You know how how deep we have to go. Let's see. This looks yellow. I'm I look a lot at the color you know because yellow color usually means adenoma. Not always but most of the times yellow means adenoma capsular. The capsule is whiter than the adenoma which is more yellow. Okay. Here. So we are progressing a little bit getting mobility but here we still need to go around here. Try to stay horizontal. Now I want to go below the sphincter to to try to remain. You see this could be an access incision as well. You see and I want to go up here around this nodule this yellow tissue if I can and again millimeter by
- millimeter I want to improve the situation. I want to improve the access. Okay. You cannot do a forceful dissection trying to go around this nodule. You know, you want to do small improvements in dissection, progressive mobilization. You see, trying to develop a good plane that will finally let you do what you want to do. No, here coming up and around. We still have some yellow tissue there above. Let's see. It's probably getting closer to the 12:00. region. There's no help from the patient. Huh?
- It's not helping us. That looks yellow. We can go below it. Try to see if we can find a better capsular plane. Sometimes when you do that, you can realize that you're going too deep and then Okay. So, you have to go back to the previous plane. But here you see now I'm trying to reach closer and closer towards the 12:00 area. In this case maybe my line is not so perfect. So I'm going to try to spend a little bit of time trying to do a better line that I can then recognize better. Here we have the 12:00 tissue. Here you see here we are taking this plane which looks quite good but when we come to the other side we
- realize that there is some discrepancy just connect at the end we want to remove the orange we want to take the orange out towards the bladder so it's never very difficult you need to think what can I do to connect th those two apparently different planes no it's usually just connecting them by cutting whatever is separating them. I'm always thinking that the objective the final objective is to push the adenoma into the into the bladder. So there we are coming up. Coming up and down. Let's see and around. No, we want to go around.
- Let's see this side. Maybe here. Now we can do a little bit more of the lateral dissection. You see how I am touching the tissue a little bit more because I think the plane doesn't detach so naturally so easily. So I need to do a little bit different distance. So the distance that I'm using with the fiber is is getting me much closer to have a much more disruptive effect because I want to to be able to progress otherwise the plane will not give so easily. No. So that's how you adapt the energy usage to the to the to the case. No, you want to progress carefully. You
- see we've gone quite antior here to try to make sure that we remove everything. And now we have to look down because we want to reach the bladder neck. If you are let's say very afraid of entering the bladder this way. You know of course you can take it as close as you can to the bladder neck. So trying to progress you know slowly and carefully try to get closer and closer. But if at the end you you are afraid of entering the the plane, there's a trick that I'm going to show you. So because I am very used to seeing this this anatomy is like this and the bladder neck and sometimes I can tell that I'm reaching
- very close and I know more or less what to expect. But when you don't have a lot of experience, you might be a little bit more anxious to just continue digging here. You know, it starts to look a little bit uh how do you say deep and you don't dare to continue. No, because you see it's starting to look deep and you're not comfortable. No, you come here. What is this? Am I going to perforate or what? No. So what you can do is you can go inside again. You see you go inside the prosthetic urethra and you try to cut here. Okay? You do a cut like that
- and then you return here. You see this will confirm okay that you are good to enter. It's a very simple idea. I know uh we are we know the anatomy. This is how I mean at the beginning you're a little bit scared to do that. You don't want to do something that has no no easy solution, you know. So then over time you get more and more confident and then you know you just trust this look of of the bladder neck. Trust this sign of of the whale. We call it the whale. the sign of the mouth of the whale. No, because these lines look like the mouth of a whale or you know there many ways to to call that.
- There we are.
- coming down the bladder neck and trying to connect. You see what we had with uh the rest. Let's see if that's a better plane. Maybe sometimes we can go slightly deeper there and find a a good plane still. we find that we can remove more tissue. You see this plane doesn't look anywhere near the other cases we saw today. You see, and you will find cases I still find planes that I think I think I never saw something like this, you know, for some reason the tissue looks the look of the tissue is highly variable. And then you need to think Okay. Is this more or less smooth? Is it
- is it uh does it look like the capsule? You see it is is it uh how do you say uh coherent smooth mostly white? I mean this case everything looks yellow. No, but it looks capsular to me you know. Is it perforated? No. Okay. So it must be a good plan. That's what we have. No. With this we have to work not all and I tell you something when I when I started with green light I I started doing enucleation with green light and I was doing mechanical enucleation with the endoscope you know I was dissecting with the tip of on the endoscope sliding the tip over the capsule like if it was my finger no trying to do
- an open enucleation and then I would use the laser to to coagulate and to cut some, you know, fibrous fibrous uh bridges of tissue that, you know, I saw that I might better cut with the laser rather than try to dissect force, you know, with force with mechanical action of the tip of the endoscope. And you know I was always a little bit concerned when I was doing this in nucleation with green light. I was always a little bit concerned that the plane might not be good. You know sometimes we found planes that developed really really nicely but sometimes the planes were horrible. And you know I I started understanding when I started doing hol that with energy dissection you see even when the plane is very bad and it doesn't detach very nicely
- you can find a plane you can find you can follow a plane you know and [clears throat] maybe no I don't know why stopped Maybe the memory stick was was full or something. Okay. So you see energy allows you to work these planes much more safely I think than trying to do mechanical. You see when the plane gets very thin we can navigate very carefully. We can target the laser towards the adenoma and uh we can progress quite well. And doing this mechanically was very very scary. you know it was very difficult and that's the pro the problem with all
- the mechanically based dissections no when when you when you do I think u also by polip of course you can use the energy also to try to break no the find the the plane but I I don't think it's so easy here you see we see that we got some depth not too bad it's a small perforation there I don't I don't know if I did it with the laser or when I was pushing the the capsule sometimes. Could be a laser. I don't know. There we are trying to continue our dissection. Now, as we open the bladder neck in both sides, the objective is to go from 12 to six in both sides and to connect here below. So I'm seeing that
- this lower plane can dissect quite well now that I have liberated the lateral aspect. So I'm going to continue a little bit like that and then we will see what happens laterally. How close we are to the to the bladder neck area. How much can we dissect here? Sometimes we have to negotiate this angles like this. You see? So coming up, coming down, trying to continue
- trying to join the lines, you know, keep keep the lines going wide. You see trying to connect. Let's see. This is posteriorly. I think we are quite advanced. See, I try to keep the fiber more close to the anterior here. This is the zigzag technique. When I come to this side, I go up and I continue towards the other side. When I finish this and I want to change direction, I go up again. You see? So this is how you negotiate the posterior plane. Trying to go up as you go. No, trying to get closer and closer to the side of the of the adenoma because you want to peel, you want to cut the fibers that join the adenoma with the capsule
- without deepening too much in the capsule into the capsule. So here, let's see. We are getting closer, I think, to the bladder neck area. Let's see. Let's get that connection coming from side from the side towards the middle like that from the side towards the middle. This is normally a good way to navigate the posterior plane. Try to go from the side like this and then come to the other side and do do the same. Here we can see where the plane is going. So maybe we can continue detaching a little bit here. I can see some depth. So we need to keep further up. You see,
- we can negotiate and we can be precise with the laser. We can do what we want. So this precision is allowing you to go even when the capsule is thin. Even when the plane is difficult, we can progress quite safely. That was a mistake. I lost control for a moment. You see, that's why you have to try to to be controlled all the time. In this case, I think there was like a little step and the fiber jumped and it caused a little like this. So, try to move slowly and to try to control the the laser to to avoid this little problems.
- Let's see here. And down and up. Now, I think we can push this lobe into the bladder. This will open up this plane a lot. And then when we reduce the hinge, the hinge laagra I think it's hinge. No visagra. Let's look inside the bladder to see where is the where's the u here. Not so far. So, we're going to cut a little bit here. Trying to stay medial.
- Yuo is now lateral to where we are. Okay. And let's see in this side what happens. Later neck lateral. So you can finish comfortably here. So I don't know how long it took, but it was like 25 minutes or something. No, not too much. I was able to navigate a difficult plane quite efficiently by working continuously. See, now it doesn't look so bad. No, the plane. Let's do some heistasis.
- Okay, this is some bleeders here epically.
- It's pretty good. Sometimes you can try to be a little bit more aggressive. Maybe remove this little bit of tissue. It's difficult to say sometimes which which is the right plane. I think we have removed the anomia quite anatomically but sometimes we find this little bumpy tissue and you can decide to trim it to cut it.
- Sometimes if you leave anterior epical tissue, you can have a little bit of growth and then you have an obstructive problem. But maybe not. I don't know. Some people are not very concerned about living tissue because they think they did a quite big fossa. So, and they look at the statistical let's say possibility of the patient returning with problems after such a good resection. But I remember one case he had a 100 gram pro. you know, we took out 100 grams and he had like two grams of tissue remaining at the apex and he got obstructed and I remember I did a ultrasound after the operation and the cavity was super huge.
- So I was very impressed how how is it possible that one gram two grams of tissue left near the apex would behave so obstructively you know and so I reoperated the guy and I took the tissue then he developed prostate cancer after time so that's why I'm a little bit I mean try to try to remove everything if I can I think you can try to remove everything and it can be as safe as probably more safe than leaving tissue behind because sometimes patients bleed when you leave residual nodules and residual tissue. So, it's more okay.
- You good? And you good? This is good. I think there's not much left tissue left. Let me show you one thing. So when the prostate is like this, it's very hard. You can go in with the laser and do some some cuts on the surface. You try to cut and make it more irregular. It's moving around too much. But you try to make it more irregular. You see, you do some cutting on the surface because it looks like very hard tissue. So this way you you enhance the
- more grasp. No. So some people do this systematically, some people do it sometimes. In this case, it felt maybe a good idea because you see the morcellator likes the reg irregularity. Doesn't take long, you know. Okay, you understand the concept.
- This is
- Okay, now back to Morcellation. I'm going to focus. You see, it's very difficult to grasp this this tissue because it looks a little bit hard. So, it's going to be useful to have this irregularity.
- It's not so easy to grasp it.
- The floor is wet and the pedal is sliding away from my feet. on my foot. So you see here I have the risk of uh absorbing too much water you know if if the morcellation is not efficient if the attachment is not good I might be sucking too much water and the bladder will get uh progressively let's say less full no so you see the pressure goes down the bleeding starts and the visibility is compromised so I pause for a moment to refill And I wish I had a second inflow. You know, mostly in every case, almost in every case, I'm okay with that. But in some cases, you miss the second inflow.
- Let's see. I could tell this tissue was like more more hard. No, more difficult. The plane was not so nice. We had to cut through sometimes sculpt our way through the plane.
- It's very slippery.
- Let's fill the bladder again a little bit more. This is the fossa. Visibility is not too bad, but it's getting worse. The problem with the bladder when it empties a little bit is that it gets more floppy. So this action can can get the bladder because it's more elastic is not properly distended. So we need to be careful. Morcellation has its rules. We there are some rules of morcellation. Want to see if I could bring it into the fossa but it's not coming in so easily. Let's see. Again you need to be technical. need to have a technical mentality and
- see what you can do. Try to progress safely. It's coming along better. I think now I brought it near the blad neck. Maybe we can slowly bring it inside the fossa. But the the blade is away from the bladder now. You see it's now more in the fossa. There was some clot in the fossa. You see when we enter the visibility decays quite a lot. But I'm totally not moving myself. So I'm remaining in the same
- spot. Hopefully the blood will be washed out. we can get to see a little bit better. So sometimes it's a challenge but you need to adapt to the degree of difficulty with more let's say technical domain more technical you know proways I don't know how to say uh you need to be excellent on how you use the instruments how you position yourself to try to complete the morcellation again If you are less experienced,
- you're going to tolerate less bad visibility. So, you know, with experience, we can sometimes morcellate with not so good visibility. But, of course, you don't want to take this to the to the absurd absurd. We finish. This is sphincter. Bravo. Nice, huh? Nice case.
- Yeah. Phenomenal.