
Surgery
Real Life HoLEP #34: Step-by-Step En Bloc Technique Explained
Dr. Fernando Gómez Sancha · ICUA
Dr. Fernando Gómez Sancha · YouTube
Language: English. YouTube audio metadata.
Surgical content for professionals. Contains footage of an operation.
YouTube applies an age restriction: if playback is blocked, open the video on YouTube.
Playback connects to YouTube. Your search query is not sent to the player.
About this video
Based on automatic YouTube captions; not clinically reviewed. Check technical details against the video.
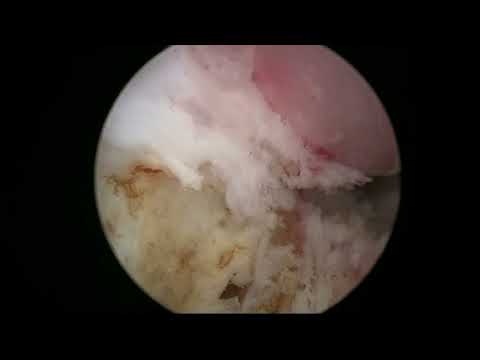
A step-by-step en-bloc HoLEP teaching case in a three-lobed prostate. In the automatic captions, the author presents it as an ordinary case that shows the surgical sequence clearly. The explanation repeatedly returns to the white line, progressive mobilisation of the apex and connection of the dissection planes.
Mobilise and connect
The commentary breaks the apical dissection into gradual mobilisation and connection of the posterior and lateral lines. It describes working on both sides before connecting anteriorly, keeping the sphincter as the relevant anatomical reference.
Reading and correcting the plane
Later passages discuss looking at the tissue on the screen and adjusting laser aiming when the dissection becomes too deep. The teaching point is continuous feedback from the visible anatomy, rather than simply repeating a fixed movement.
Documented details and sources
Only details explicitly stated in the sources. Missing information does not mean it did not occur.
- En bloc
Real Life HoLEP #34: Step-by-Step En Bloc Technique Explained
Source checked: 2026-10-06.
Available transcript · English
Automatic YouTube captions, not clinically reviewed. Names, technical terms and numbers may contain errors. Check them against the video; complete audio coverage has not been verified.
They may contain transcription or translation errors; check the explanation in the video.
- hello this is fernando amit sancha welcome to another video of the series of real life polyp cases this is a trilobar prostate and the case doesn't have anything special but i think it shows the surgical steps quite nicely and it might be useful for those who are learning to do and block olive i'm getting a lot of feedback from a lot of urologists who find these videos useful and i think it is a good idea if you want to learn to do hollap to watch them because i will be insisting
- on important aspects of the technique okay so the first thing you notice is that when you move your scope you have to be very steady you have to move slowly and carefully your hand has to be steady this is the localization of the interface between the sphincter and the apex you can tell if you follow this curve you can often tell where is the limit you want to get close to the because if you go further inside then the operation is going to complicate because the plane is the plane you know and then you have to mark the white line on the edge of the sphincter and not further inside because if you do that the plane will try to follow its uh
- route irrespective of where you marked your mukusa so here as you can see this is a white line this is the line that is going to serve as a reference for the rest of the procedure it's interesting to me to see that even you know urologists who are not doing a block are starting to recognize the importance of marking this this white line at the beginning because it serves as a reference that will help protect the sphincter here in order to enter the plane this is a little bit of mechanical dissection sometimes i do sometimes i don't mostly i don't do that but [Music] the important aspect is that you have to aim your fiber against the floor
- of the very montanum here you see you want to go well this is my the normal way i do this but you see that the fiber is not two or three meters above the level of the floor it is right at the floor level that's important i see a lot of surgeons trying to start above that and i think that complicates the entry which is a very very simple very very simple maneuver if you don't find that this is very very simple maybe you're not doing it's right because it is always very simple to enter at at the apex then of course the concentration will go to produce a nice line of dissection a nice line of dissection that goes from side to side i tend not to push
- too much towards the side i don't want to traumatize the sphincter i think the sphincter is very comfortable while i do this because the orientation of the scope is a little bit looking down and here you concentrate on keeping the line in the middle of the screen so you can see a little bit of capsule and a little bit of adenoma and you fire against the line it's very simple it's very fast and often you see that after you know four or five minutes of surgery you have already dissected the posterior plane which is quite encouraging and promises that the operation is going to be fast and nice okay so here i'm putting my fiber now 12 o'clock and i'm going to do a line i'm going to cut on the adnoma
- well what i want to do is to open the door you see when i do that i'm gaining a little bit of access so this cut is not following the plane of dissection it's just giving me a little bit of access so i can see this i can see the apex you see it's difficult to reach where i want so what you have to do i think is to be very very uh careful at the beginning just mobilize the posterior apex mobilize and boost your apex because that mobilization will help you later on to reach where you want and connect so this step i would call it mobilize and connect mobilize and connect mobilize the post lateral posterior apex and then connect the line so when you
- have to continue later with your dissection you have a line that is perfectly connected you see the posterior aspect with the lateral aspect then when you go back you can repeat the same maneuver which is to make a little cut on the anoma that will give you access and then allow you to enter and look for the proper plane you see the line was there the dissection goes here so this is a very very useful idea and also you know don't be so aggressive trying to go all the way up until 12 o'clock at the at the first intention you see that we are leaving a little bit of tissue there let's see if we can rescue that later um but just mobilize and connect mobilize and connect so you can go
- up the ladder you know you can try to climb progressively towards 12 o'clock doing this kind of maneuvers progressively getting there here the incision is horizontalized sorry because we are under the sphincter and then again you know you try to gain three four five six millimeter more you know like that and then you take this towards the bladder neck so we mobilize mobilize mobilize and try to get towards 12 o'clock you see the concept is that you want to mobilize the apex so it will give you access to dissect the anterior part without traumatizing the sphincter so it's a very very careful ascension
- going up there you see that we are using the quanta system laser with uh virtual basket and it is a joy because these are the 12 o'clock fibers you see initially they're parallel to the fiber so that's why i will go now to the other side before i reach at 12 o'clock i think i had a visitor in bulgaria from from chile and he pointed this out to me he said you should i mean you do a very symmetric technique so you should always be symmetric at the apex and i think it's probably right i of course when you know the anatomy you can do it as you want but i think if you dissect liberate mobilize and connect on one side and then mobilize and connect on the other side
- the approach to the 12 o'clock area is much simpler there you saw how contacting sticking the the fiber into the tissue can produce this little holes be careful with that here again this is a horizontal part of the dissection here i'm cutting horizontally under the sphincter you see so we can reach again towards the other side until we reach the 12 o'clock fibers you see the 12 o'clock fibers are [Music] recognizable they are like a ligament there so again mobilize you see progressively without putting any stress on the on the sphincter so initially we liberate the digital part
- and then we move towards the more proximal part and here you see we have the 12 o'clock fibers and you can see that we already dissected both sides so it's connecting now cutting at 12 o'clock it's quite easy as long as you are in the white region you know that you're not near the sphincter so you can happily cut this is the wonder wonderful concept of marking the white line that you have a reference when you have to look up there at 12 o'clock and then here's the connection from side to side here it's important to to go all the way up because you don't want to leave a normative tissue at 12 o'clock that could become obstructive that is a loose endoscope i'm sorry for that
- it keeps disengaging and but you see that we have connected anteriorly and now again you have to make sure that the lines connect so you want to do the anterior line sometimes you have to work on it a little bit because it's not so easy to establish like the posterior line but once you have a line that you can follow you can check the sphincter and see that it was beautifully preserved with all its mukosa and then the rest of the operation is usually a piece of cake here you just have to follow your line and constantly react to what you are seeing on the screen you know that sometimes the plane is visible sometimes it's not so visible but of course you can recognize when
- you're going deep into the capsule like here you see this is this is capsule we don't want to take that further you know deeper so what you do is you aim your laser closer to the adenoma to correct the plane you see the way i use the energy is a very very soft very nice uh effect on the tissue you see it cuts the fibers it coagulates the tissue so we have good first spasmostasis but it also is very smooth it's a very smooth effect so if you start perforating the capsule typically you don't go through it you know you just see that the capsular margin is is thinning you know so that you have time to react and to
- correct so i think this is i mean there are many things you have to master to to do good in nucleation and i think probably the most important is to master having the steady hand you know not moving around all the time being able to to do these very precise movements you see with your scope trying to go up and down following the line but also keep the fiber at a distance that will produce a nice effect that is constantly dissecting you don't want to go over the line and coagulate once and again and again you you want to deliver the energy in a way that it will disrupt the fibers that are holding the noma and the capsule together it will coagulate a little bit
- but it won't have a very explosive or a very deep cutting effect just you know like kissing the surface very very softly you know um like that so you can you can get a nice dissection also i pay attention to the color of the tissue because the capsule is usually more white than the adenoma which is usually a little bit more yellowish yellow and here of course i'm now trying to adapt to the edge of the ednoma the norma is a sphere so you have to adapt to the to the sphere and in order to do that i will start firing closer to the adenoma rather than closing
- rather than firing against the line you see this is the line here i am seeing some yellow tissue so i'm going to try to take it out huh i'm not afraid to explore with the this very soft effect of the energy if that has to be removed or not i think it does have to be removed and you see that's why i'm trying to get of course you can go a little bit deep sometimes and then you have to correct but i'd rather take a reasonable risk to make sure that we are removing all the adenomatous tissue so here we are [Music] again below the adenoma and here you see you have to start aiming towards the abnorma because when you aim towards the adenoma
- let's say in the inside of the line up there you see the energy is going to have the effect of disrupting the fibers that are keeping adenoma and capsule together but there's very little aggressiveness against the capsule as you can see when you keep your fiber close to the adenoma then you can dissect the plane even when the angle it's following it's quite quite closed you see so here again i i found this yellow area so i'm going to try to go again around it trying to keep close keep close to the adenoma so that the capsule doesn't receive aggressive energy but just a little bit of coagulation this is a way to adjust the targeting of the laser
- to the moment in the operation when we start we fire against the line when we finish the second part of the operation we fire against the inside of the line so closer to the adenoma than to the uh surgical capsule okay you see sometimes that is a little bit looking for trouble but as you will see it was quite successful here of course you have to keep the fiber close to the anomala because you don't want to penetrate in the capsule there you are you see the posterior aspect is being dissected now i'm going for example uh towards the left
- so before you turn uh the direction again and you go to the other side you should recognize that the plane has opened a little bit you know when you when you go from side to side or here for example we're going downwards and then we're going upwards again you have to recognize that the plane has opened a little bit we don't want to go deep so in your next excursion when you're going to change direction you have to get closer to the anoma you see so that you adjust your targeting constantly this is the key to the operation uh another key element of the operation is the speed at which you do the dissection this is very interesting this is a landmark you can see the rain under the bridge
- you know you are under the breach this is the the bladder neck and you see the rain pouring you know it reminds me of this scene of the matrix i will i will insert a photo so you can see what i mean you know this is a patrognomonic sign that you're going to enter the the the bladder so you can cut there you are anterior to the anterior commissure and you're going to cut the fibers of the mucosa and submucosa to enter the bladder all right this is the circum dissection of of the bladder neck here as you can see i do a little bit more contact because on the other side of of this wall that we are cutting is just the bladder so
- you know i i don't think it is compulsory to avoid contact you know it is a sin to avoid contact you can do contact sometimes and it's useful especially when the tissue is very hard or in patients who had previous operations so that's again cutting the the rain cutting the bladder neck and so mucosa trying to follow the line you know connecting the lines it's important to connect the lines and to have only one if you can because if you do three four five lines then everything is a mess and and you make it more difficult for yourself okay that's our line i'm now on top of the adenoma pushing it down to reach this this area and sometimes that distorts a little bit the anatomy but
- you get used to it you see that my fiber is firing from 12 o'clock but i can reach perfectly here we want to see where the rental orifice is and it's quite low so we have to be careful so here you see you judge the depth of your dissection it was a little bit deep below there so we don't want to be very very aggressive but here i am dissecting the lateral aspect closer to the bladder neck you can you can reach this area from above or from below both allow you to do probably a little bit different well the approach is a little bit different but both allow you to cut this plane here we're coming from below you see and
- this other side and you see that my fiber is always staying close to the abnormal i don't want to perforate the capsule and this makes the technique very very very safe because you're not risking perforation of course sometimes we see small perforations but they're usually clinically not significant and here we are entering in the middle low pocket you know the below the middle low below the middle loop sometimes there's a small cavity there small concavity produced by the growth off of the middle of the base of the middle low protruding and here of course we can also see the uo and it's also closed so we we will
- have to be careful i'm going to try to stay you see with my fiber close i i really think that uh the key to hollop is what i'm telling you the targeting you see if you target close to the abnorma when you the plane is changing uh like this it is very safe and it's a much more important i think that the angle of incidence you know firing from six or from nine or from that's why i keep my fiber still because i think if you can master this uh targeting idea and hear what i'm trying to do is lift a little bit the lobe of this side so it you know stays there for a little bit and then we can push it into the bladder there it goes
- now the whole thing has flipped and now the bladder neck gets very accessible there you are so it's now a piece of cake look at the wonderful hemostasis this pulse modulation is really amazing to work with because you you focus on the anatomy you don't have to focus so much on hemostasis control and that's why i really really like this this new lasers of course if you have a lower power laser you can also work but of course you don't have the luxury of almost perfect hemostasis almost always there are some cases where even with this pulse modulated lasers you get some
- you know challenging patients where there is more bleeding than you would want and you have to keep the hemostasis very carefully probably due to you know inflammation or anatomical variations between patients among patients so that's the six o'clock region and here the only concern is yeah the uo to keep it safe i'm quite happy when i go medial to the uo you know my edge of dissection is medial because then i know that whatever i do next is going to be safe and here we are almost there but you will see that i get a little bit close to the um so you're never too careful here uh of course we're not too worried about
- uh hitting the uo because with with this uh energy with holmium the penetration on the tissue is quite shallow and the chances that it will obstruct if you lace it superficially are relatively low all right so if if we hit the o partially or totally you see here i was close i didn't hit it but probably you you could just monitor the kidney to see if there's any direction taking place uh after the operation in in subsequent visits you know so you have to be careful with that but we would not put a double j stand or anything like that as a rule and here you can see the excellent preservation of the sphincter and its
- mucosa patient was perfectly continent the following day so here is the adenoma you see the nucleation time was around 23 minutes so this and block approach makes a hollow very very fast and you see that the visibility during the nucleation is excellent in this case we had a very large middle lobe and we didn't have to worry about the middle lobe because we are only dissecting the area where the normal is contacting the surgical capsule so the the middle lobe is inside the bladder and we don't care about that
- sometimes when you are going to do a very large gland the estimation of volume is compromised by the big middle lobe so it seems to be a very very large gland and then it's a super easy case because the component of the adenoma that is in contact with the surgical capsule is not not so not so large and this is the piranium oscillator you see this is the standard view huh they had no mount top the blade below and two black triangles on the sides that tell you that the bladder is away from you this is the safe motilation position and thankfully the tissue is quite soft and more slate's really nice sometimes we find harder prostates that give us some more difficulty
- and at this speed of 10 or 11 grams per minute the total operative time is quite reduced that's why i think the paradigm has changed with hollap it's now a very very standard and affordable operation that is not dramatic at all but it does require a very good teamwork you know you need to be helped properly by your team um and they have a big big big responsibility on the case succeeding you know it's not only the surgeon who who is doing the operation it's the team of people that have to be present in the operating room present mentally as well concentrated on what's going on and
- helping the operation to to succeed but it's a totally uh you know safe operation it's uh there is a simplicity to it that is perfectly achievable you know once you understand the principles of the dissection of the manipulation of the scope of the targeting of the laser and the principles of the anatomy of of of the interface between a nomad capsule and you integrate all this information it becomes a very very easy and very enjoyable operation of course we face some challenging cases but they become easy as well with with
- experience so there's no reason why you shouldn't try to learn look at that that's a beautiful fossa there are no more pieces inside and i think the case is nearly finished where's the uo there it is it's perfectly healthy just a little coagulation close to it but catheter and the patient will go home very soon without a catheter thank you for your attention