
Professional education
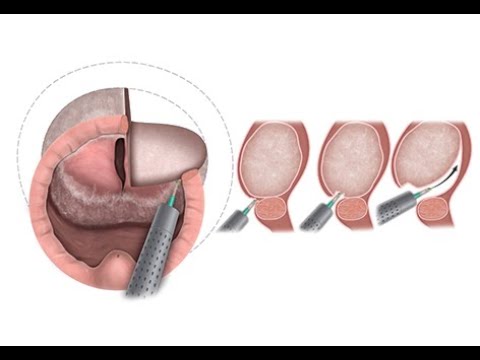
HoLEP Technique in 8 Minutes with Drawings — EAU 2022 Award Video
Dr. Fernando Gómez Sancha · ICUA
Dr. Fernando Gómez Sancha · YouTube
Language: English. YouTube audio metadata.
Professional education. May contain surgical footage.
Playback connects to YouTube. Your search query is not sent to the player.
About this video
Based on automatic YouTube captions; not clinically reviewed. Check technical details against the video.
An eight-minute explanation of en-bloc HoLEP with drawings and a focus on early apical release. The available automatic captions discuss marking the white line, connecting the posterior and lateral planes, and developing a continuous line of dissection. The recording then follows bladder-neck dissection and movement of the adenoma into the bladder.
Anatomical references in the explanation
The commentary uses the white line as a reference at the sphincter edge. It follows the connection of the posterior and lateral dissection lines before the anterior attachments are released, illustrating how the surgeon maintains orientation.
Following the contour of the adenoma
Later passages discuss changing the direction of laser aiming as the dissection turns around the adenoma, then rotating the adenoma into the bladder. These are teaching points from this recording, rather than measured results of continence or safety.
Documented details and sources
Only details explicitly stated in the sources. Missing information does not mean it did not occur.
No clinical case details have been extracted for this video.
Original title and description on YouTubeSource checked: 2026-10-06.
Available transcript · English
Automatic YouTube captions, not clinically reviewed. Names, technical terms and numbers may contain errors. Check them against the video; complete audio coverage has not been verified.
They may contain transcription or translation errors; check the explanation in the video.
- and block holip with early appical release using virtual basket pulse modulation from quanta system this pulse modulation provides better cutting and hemostasis the end result after the classic three Lop holip technique provided a high rate of postoperative temporary stress incontinence with the enblock approach we managed to preserve the sphincter mucosa and this is associated with a very low rate of poster stress incontinence this case is showing uh this technique in a man with a 990cc prostate the initial step is to Mark the white line which is a way to set the landmark of the sphincter and the fact that we cut the mucosa at the beginning of the procedure
- ensures that it's not going to break as it did with the three uh L classic techniqu so that the mucosa of the spinter is going to remain attached to the spinter providing an excellent seiling effect and uh excellent continents uh immediately after the operation this step is performed with the fiber at 6:00 that allows reaching into the anterior aspect then we enter the plane in the left side this can be done with energy or sometimes a little push can help uh determining that the plane is correct and then of course uh the entry in the contralateral side
- follows to find the posterior plane in order to be able to develop the posterior plane the frenulum of the veru has to be inced as well to connect both planes and then that will generate a line of dissection that is a fantastic Landmark to follow to develop the posterior plane in this uh part of the operation the aiming of the laser is against the line and that will uh allow to develop the plane very safely once the posterior plane is developed the fiber is rotated and taken towards 12:00 to starts the early appical release initially an incision is
- made to deepen the white line that will give us access to try to find the anatomical plane of the lateral aspect of the prostate this plane has to be taken towards the bladder neck to mobilize the Apex and it has to be uh ensured that this line will connect with the previous posterior line then again before progressing anteriorly it's important to catch the appical uh attachments first so initially an incision is made to deepen the uh line and then the proper plane is sought to develop the plane towards the anterior part this cutting into the
- anoma this deepening of the white line doesn't leave anoma behind it just gives access access to find the right plan easily in this case the white line was not completely finished at 12:00 so I thought it was a good moment to finish it by incising a little bit of the mukosa that was not accessible at the beginning then the same steps are taken on the other side initially an incision is made to the white line to deepen it and then this phase consists in mobilizing the lateral aspect of the Apex and connecting to the posterior line so there is a definite line that goes around the aroma that will guide us during the
- dissection then again we go back to the Apex to cut initially cut uh into the the white line to deepen the white line and then we seek for the good plane to continue the ascending d section towards 12:00 the idea is to leave only the 12:00 fibers to be cut at the end having a reference in both sides the fact that uh the anterior Apex has already been dissected a little bit from the capsule makes it descent also when cutting the 12:00 fibers we initiate the incision horizontally at the beginning and then of course once the spinter is left behind we have to go up all the way to find the proper plane so that we don't
- leave any tissue anteriorly at 12:00 it is not necessary to leave tissue at 12:00 because patients are perfectly continent when everything is removed as long as the mucosa of the sphincter is preserved so no need to lift tissue anteriorly but of course we have to be careful with this disse section this would be the end of the early appical release you can see it's not an immediate appical release it's an early appical release and it needs this steps of careful mobilization of the Apex until the sphincter can be released after that we have a very nice surgical space that is uh irrigated uh perfectly by the uh scope
- visibility is great and then we have a circumferential line of dissection going around the atoma so it's easy to follow this line and you only have to care uh to check the quality of the tissues um when the 12:00 uh vertical fibers are found this is a pathognomonic sign that uh this is the entry point to the bladder and then the bladder neck is dissected following the direction of the fibers and uh the lines are always uh deepened and developed this is the checking of the position of the Ral orifice Which is far away in this case and it's very important when we start dissecting these uh difficult angles for
- example below the atoma to fire closer to the atoma than to the capsule this will protect the capsule the energy will be absorbed by the anoma but uh it will allow all you to cut the fibers that join together adoma and capsule then the adoma is lift on the left side and pushed into the bladder that gives better access towards the 6:00 region and then the pushing continues following the same rotational movement so the anoma goes into the bladder but rotated not uh front uh wise and then the 6:00 fibers are cut to complete uh a nucleation it is a fast procedure easy to see during the
- procedure great hemostasis also thanks to the virtual basket uh development and of course the perfect preservation of the spinus mucosa will allow for a perfect continence after the procedure in the majority of patients