
Surgery
En Bloc HoLEP — Special Case Demonstration of Apical Release Technique
Dr. Fernando Gómez Sancha · ICUA
Dr. Fernando Gómez Sancha · YouTube
Language: English. YouTube audio metadata.
Surgical content for professionals. Contains footage of an operation.
Playback connects to YouTube. Your search query is not sent to the player.
About this video
Based on automatic YouTube captions; not clinically reviewed. Check technical details against the video.
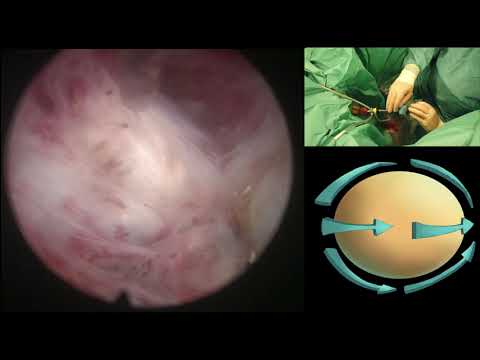
An en-bloc HoLEP teaching demonstration focused on apical release. The automatic captions describe bleeding near the apex at the start and explain the use of connected dissection lines to maintain orientation. The commentary also addresses laser aiming, visibility and coordination with the operating-room team.
Keeping the dissection connected
The explanation returns to a continuous line linking the posterior, lateral and anterior planes. It describes keeping the dissection line centred on the screen and adjusting the aim when the surgeon needs to correct the depth.
Teamwork during the procedure
The closing teaching points discuss having a trained team ready to help with instrument changes and problems with the morcellator. The recording therefore covers practical operating-room coordination as well as the visual anatomy of enucleation.
Documented details and sources
Only details explicitly stated in the sources. Missing information does not mean it did not occur.
- En bloc
En Bloc HoLEP — Special Case Demonstration of Apical Release Technique
Source checked: 2026-10-06.
Available transcript · English
Automatic YouTube captions, not clinically reviewed. Names, technical terms and numbers may contain errors. Check them against the video; complete audio coverage has not been verified.
Selected spellings of enucleation, morcellation and holmium terms have been edited. This is not a full audio or clinical review; the original captions remain the source.
They may contain transcription or translation errors; check the explanation in the video.
- how i do hollap for bph by fernando sanchez rodriguez we're very pleased to be participating in this project from the brazilian society of urology and i'm going to introduce you to the and block hollop and block a nucleation in this case we had a man with a 168 cc prostate so quite a large one and there was a lot of bleeding at the apex which made the optical dissection a little bit more difficult so in cases like this what we do is we try to mark at 12 o'clock just past the sphincter proximal to the center to have a reference and then
- we go near the barrel to find the plane of the zoom adenoma and dissect it carefully not pushing too much laterally so we can see where the posterior edge of the noma is lying here again on the other side a similar maneuver is carried out opening the plane between a noma and capsule and then of course we have to try to connect the 12 o'clock mark with a lower aspect carefully to preserve the sphincter's mucosa the wonderful aspect of this approach is
- that we will preserve the sphinctest mucosa and that will provide the patient with immediate perfect continence and it will reduce the chance of stress temporary stress urinary incontinence that we have seen with the classic technique and the classic technique the dissection of the lateral lobe at the apex is carried out without even looking at the sinker and often it results in the de-epithelialization of the sphincter so this is the marking of the white line so it is a circumferential line that demarcates the limit of the apex with the limit of the adenoma then we have to connect both lateral apical planes in the midline by cutting
- the frenulum of the veramontanum to connect the two lines of dissection the two lines of attack that we have demarcated apically and then develop progressively the posterior plane this development of the posterior plane can be done very fast it's quite easy it's important to keep a wide line that goes from side to side because that keeps orientation and not always we can see a perfect clear plane of separation between a norman capsule and keeping this line around the adenoma is going to help us when it is not so clear where the plane is here you can see that the sphincter has been preserved the white line is a little bit more inside
- and now we're going to start with the apical dissection for that and in order to release the the sphincter from the adenoma we have to cut a little bit in the edge like deepening the white line that we marked at the beginning even cutting a little bit on the adenoma we don't mind cutting for three four or five millimeters in the adonoma because that will actually detach the apex of the prostate from the sphincter and it will give us better access to this plane i like to do an initial posterior apical dissection and deepen it towards the bladder neck until i can connect with the posterior line of attack posterior line that we had done because it's important to be able to go around the and to have a continuous line that
- connects the lateral plane with the posterior plane with the anterior plane so it's very important to connect the lines that we are developing here of course we want to protect the sphincter and as we come more anterior the cutting has to be a little bit more horizontal so initially we do a cut even a little bit in the adenoma we don't mind because that will give us some space to to access the apex and to develop it carefully with the energy of the whole laser in this case we are using a pulse modulated laser this is a quanta system 150 watt laser at settings in 2 joules and 50 hertz with the virtual basket setting it is a
- very nice advanced in the technology of the consoles that provide excellent first pass coagulation and excellent cutting properties so it has enhanced the properties of the laser we use for hollop so here you can see that careful ascension carefully we have to ascend until we can position ourselves on top of the arnold interiorly when we get to that point anteriorly on one side then we have to go to the other side and this is the other side the right side of the patient and we are doing the same maneuver just coming up incising a little bit the area here between the sphincter and the adenoma on the adnoma we don't mind as i said
- deepening a little bit this incision because what we are really achieving is disinserting or you know separating the tip of the ednoma from the sphincter of course once we get the axis we want we can go and look for the proper plane so often these incisions that we made are going to be removed with the adenoma so here's the ins ascension on the right side and we will try to get towards 12 o'clock where we will find the anterior 12 o'clock fibers that we will be able to cut much easier when the scope can be on top of the adnoma as this 12 o'clock fibers will verticalize when we push the tip of the normal little bit down
- downwards so here we are completing the connection between both sides and this is the finalization of the early apical release we believe that releasing the apex early in the operation helps protecting the sphincter against traction and mechanical tear so this optical dissection combined with an n-block approach allows us to do a very fast and very safe operation which i think improves the outcomes that we would get with the three lope or the two lobe classic techniques the wonderful aspect of this technique as well is that we are irrigating a very small space
- and the irrigation of this small space is going to provide us with excellent visibility throughout the procedure we have seen some leaders and typically in the big large glands like this we are going to see them and this is an interesting graph on the lower right side of the screen keep an eye on it because it it represents how we have to change the aiming of the laser as we change or as we deepen our dissection initially we can fire against the line of attack we should never fire against the capsule but as we turn around the angle of the adnoma we have to start pointing our laser a little bit more close to the anoma and this is very very important when we do it especially in the posterior aspect
- this is a anterior dissection so we can go from side to side remember always we want to connect the lines we are doing so that when we are anterior we can connect easily with a lateral aspect and then we can connect easily with the posterior aspect this is the development of the circumferential plane the circumferential line of dissection that will take us to the end of the procedure it's important to position the scope so that the line of dissection is in the middle of the screen and this allows us to see half of the screen with adenoma and half of the screen with capsule this is the vertical fibers of the bladder neck it's a pathognomonic sign that if we cut
- there we're going to enter the bladder above the anterior commissure this is the mucosa of the bladder there are many vessels at this level so we have to be careful because there is a lot of mucosal bleeding that can make more selection a little bit more more difficult this is the circumcision or the cutting of the bladder neck circumferentially following the anatomical planes so all the anterior aspect of the prostate has been liberated and we are now cutting the bladder next circumferentially here you can see how the camera and the scope have to look towards the line of dissection the line
- of attack and here we can judge the depth of the dissection and if we're going too deep we can correct by approximating the fiber and targeting the laser closer to the adenoma and if we are leaving tissue behind we can always go a little bit more lateral more peripheral to try and remove the tissue that we want to remove typically the adenoma looks a little bit more yellow than the capsule that looks a little bit whiter this is the incision of the bladder neck when we get to this point we have to check the urethral orifice to avoid damaging it and carefully the energy is used to dissect the anatomical plane
- the other pulse modulated technology that has come out is the moses technology which is slightly different from virtual basket and they're both i think revolutionizing the use of hollop because the quality of hemostasis is much better you can concentrate on dissecting your plane without having to care for keeping a good hemistasis because it automatically happens so when you do your dissection you see the energy reaches a little bit further and provides better coagulation that allows you to concentrate just on working on the anatomy on how to target the the laser energy towards the line of dissection or a little bit closer to the adenoma
- to adapt to the anatomy of the prostate and to prevent going deep in the capsule here we managed to elevate the adenoma push it a little bit into the bladder and that only gives us a good better access to the bladder neck at six o'clock where the fibers are cut remain remaining fibers and then of course if we keep the same rotation direction it's very easy to tilt even very large anomals and then of course the six o'clock fibers that are attaching the adenoma to the bladder neck can be cut very safely and very precisely until the adenoma is detached completely and flipped into the bladder
- so this took about 40 minutes in this case we are typically able to complete these operations in around one hour even for the very large glance where we might need maybe 10 or 15 minutes more than the smaller prostates it's important to coagulate the mucosal vessels because these can bleed and they're a little bit difficult to see sometimes because they they turn towards the bladder the flow of the scope is pushing them inside and we don't see sometimes where the bleeding is coming so you have to pay attention to the mucosal bleeders and here you can see the excellent preservation of the sphincter a little bit of hemostasis has to be carried out especially in the very large glands not so much in the smaller glance
- and then the other super important aspect of a nucleation is the teamwork you need to have proper properly trained nurses that can help you very fast very proficiently because you might need to use a receptorscope you might need to change to the nephroscope that we use from oscillation if the morcellation has a malfunction they need to know how to tackle this and to solve it fast and this way nucleation becomes a normal procedure that we can do you know we can do five cases in one session from three or four p.m to to nine p.m typically one hour per patient including the change of of the patient in the operating room so
- uh many times for 60 gram prostate 70 gram prostates we can we can use even 20-25 minutes morcellation has to be carried out with care but it leads to the end of the procedure and i hope you have enjoyed this video there are plenty of full-time videos in my youtube channel that you can find easily online if you want to learn and my advice is watch a lot of videos learn the anatomy and you will be able to learn for sure to do hollop this is the tissue this is the color of the urine at the end of the procedure and thank you very much for your attention and for the invitation to participate in this project